 Windows 8 presents a new interface to the user named
 Metro Modern and the cornerstone of this new interface is the Start Screen.
The Start screen is best thought of as an expanded replacement for the Start Menu in Windows 7 and previous versions of Windows. It provides the same functionality as the Start Menu with the additional ability to run programs, called Windows 8 Apps, directly withing the Start Screen. You can check email, instant message, view photos and video, browse the internet, and more all directly within the Start Screen. These programs are included in Windows 8 and are as such displayed on the Start Screen.
Since the Start Screen is an expanded Start Menu there are similarities, and the biggest similarity is when you install programs on the computer shortcuts are automatically added to the Start Screen. Great for Metro, er, I mean Modern apps, but not necessarily great for the legacy programs that most of us are used to! In the Modern user interface(UI) on Windows 8 these “shortcuts” are referred to as Tiles.
In the past installing a program usually added a folder named after the program to the Start Menu and then added the shortcuts the program author thought would be needed inside that folder. In Windows 8 there is no folder and the program shortcuts are added to the Start Screen in the next available open spot to the right of the default programs. Convenient? Yes. Effective? Maybe. Efficient? No. In most cases there will be quite a few useless icons and there is no automatic grouping, which leads to a crowded and difficult to navigate Start Screen!
 Customizing the Windows 8 Start Screen
The good news is that the Start Screen is incredibly customizable. Each Tile(icon) can be moved, most can be resized, and the user can group icons in any way they wish. We’ll go through the process here and you can follow along. You don’t have to, and probably won’t want to, duplicate my choices, but each of the customizations you learn about will help you organize your Start Screen into something you find useful!
Windows 8 Right Click Tile Menu
Each Tile (icon) on the Start Screen has a right click menu and the menu items of each tile are specific to the function of tile. When you right click on a tile the options available for that tile will appear in the lower left corner of the Start Screen as shown in the image below.
Below is a list of common right click menu items I’ve seen to date:
Right click options for Windows 8 Modern Apps
- Unpin from Start – Remove the tile(icon) from the Start Screen.
- Smaller – Make the tile smaller.
- Larger – Make the tile larger.
- Uninstall – Uninstall the App.
- Turn live tile off – Leaves the tile on the Start Screen, but stops the tile from updating with live content.
- Open new window – Open a new instance of the program, or new window. As an example this opens a new tab in Internet Explorer.
Right click options for legacy programs
- Unpin from Start – Remove the tile(icon) from the Start Screen.
- Uninstall – Opens the uninstall routine for the program.
- Pin to taskbar – Pins a shortcut to the Classic Desktop taskbar.
- Unpin from taskbar – Removes an associated shortcut from the Classic Desktop taskbar.
- Run as administrator – Allows you to run the program with administrator privileges.
- Open file location – Opens a File Explorer window to the location of the file that the tile points to.
- Open new window – Opens a new instance of the program that allows multiple instances to run. In others it may open a new window. See browser.
- Manage – This is specific to the Computer tile and opens Computer Management applet.
- Properties – This is specific to the Computer tile. Opens the Control Panel System applet.
- Map network drive – Computer tile specific. Open the Map Network Drive applet to assign a drive letter to a network storage location.
- Disconnect network drive – Computer tile specific. Removes a drive letter assigned to a network storage location.
Of course, if we are customizing the first thing to do is to remove the tiles we really don’t need to appear on the Start Screen! Right click on the tile you wish to remove and choose Unpin from Start from the options. This will remove some of the clutter from the Start Screen and you can see the difference between the first picture in the article and the one below.
Grouping Tiles in Windows 8
Each collection of tiles is called a Group – like an imaginary folder where you can see the contents. Tiles can be moved both within a group (move to top, move to left/right, move to bottom, etc.) and between groups. More importantly new groups can be created so you can truly customize the Start Screen to best suit you and your work habits.
To create a new group simply click any tile and drag it to the blank area between, or to the side of, a present group. A gray bar will appear indicating a new group will be created. Release the tile and you’ll see that the tile is now in it’s own group.
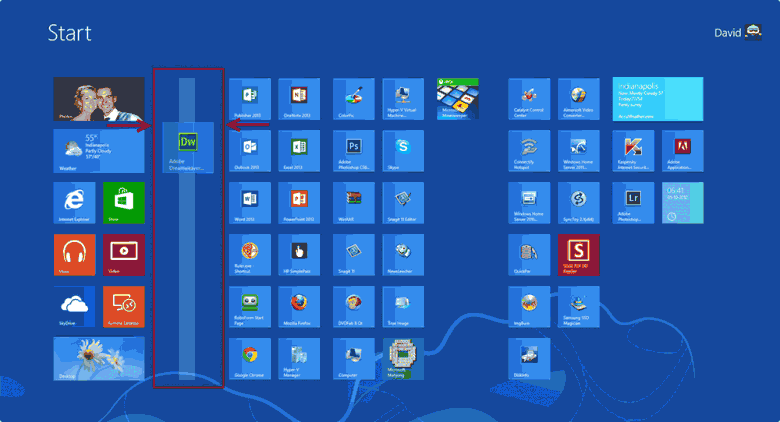

After you’ve created one, or more, groups take a few moments to further organize by moving like tiles to the group(s) you’ve created.
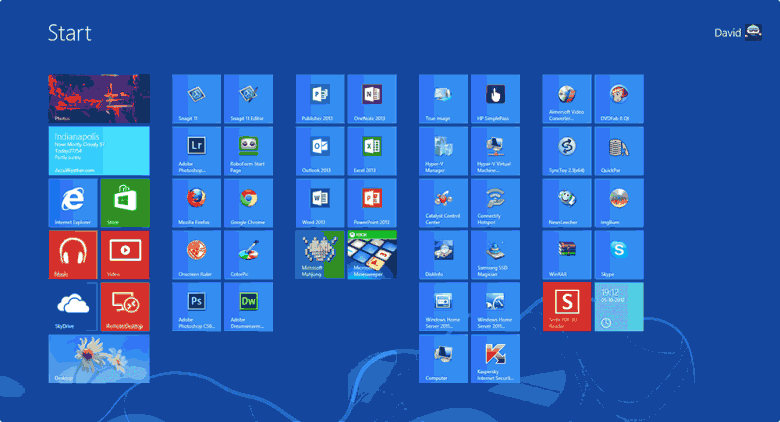
Take your time and remember that nothing is permanent – you can change your mind and refine your Start Screen at any time!
Move Windows 8 groups
Things are looking up! You’re removed unneeded tiles, created groups, and organized your remaining tiles into the epitome of efficiency. For generations to come people will wonder how you get so much done with your computer. Stories of your organization skill will be told around dinner table throughout the world for centuries, but you aren’t quite done yet!
When you are viewing the Start Screen in Win 8 you may notice a small icon with a “-” sign in the lower right corner. This button zooms the Start Screen out allowing you to view the entire layout with all current groups displayed.
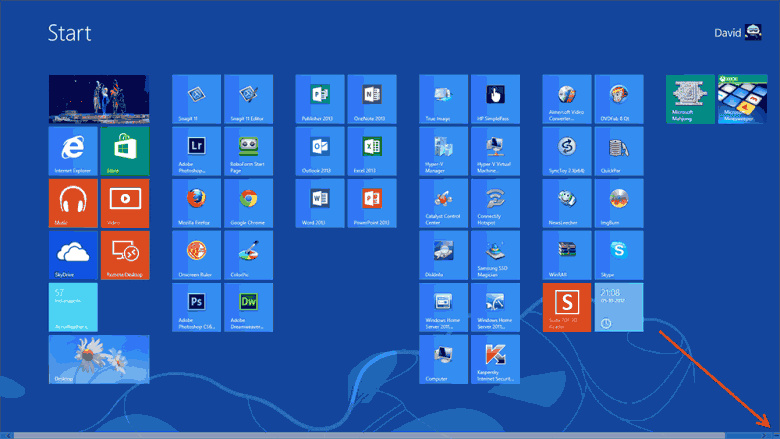
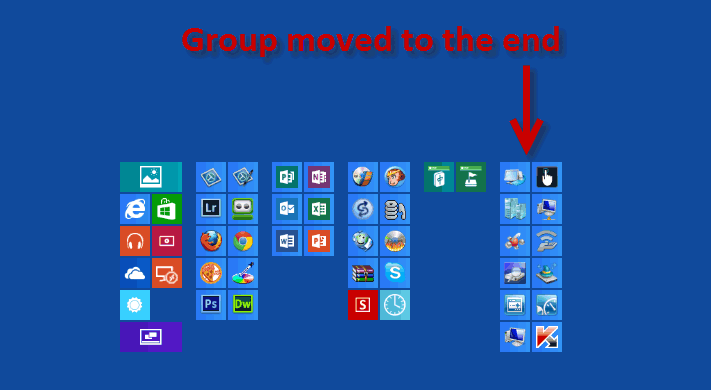
You will be looking at the complete Start Screen with all current groups and the tiles contained within those groups. In this view you can interact with the groups themselves without worrying about changing a tile by mistake. As you move your mouse over each group that group will be highlighted with a gray border. To move a group simply click and drag the group to the position you want – just like when we discussed moving tiles above.

Here is what the screen looks like after I’ve moved the group to the end.
There is one final thing you can do to complete your master piece – name the groups!
Naming a Windows 8 group
Click the “-” button in the lower right to get an overview of the Start Screen. Just like tiles each group also has a right click menu. Right click on a group and Name group will appear at the bottom of the screen.

This will open a dialog box allowing you the type the name you wish to give to the group. Type the name you choose and click Name. Feel free to name all, or none, of your groups. It’s all up to you!
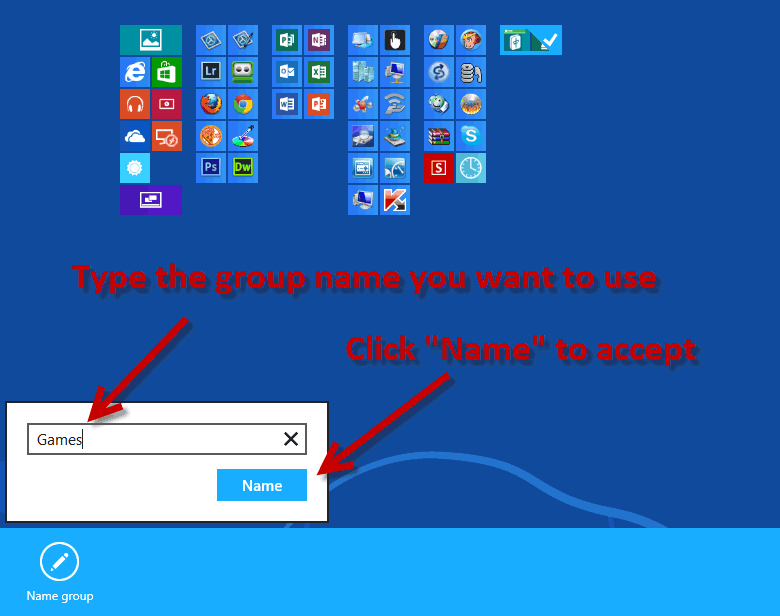
As you name a group the Start Screen will be displayed – even if you are using the overview to look at the groups or name additional groups. Here is a look at my Start Screen overview. You can see that I’ve named each group with what I believe is a useful description.
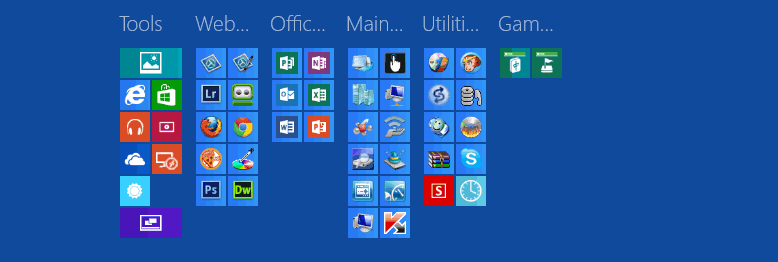
Finally, here is what the finished product looks like. Definitely a work in progress, but very organized and functional. Much better than having tiles (some I’d never use) strewn willy nilly all over the Start Screen!
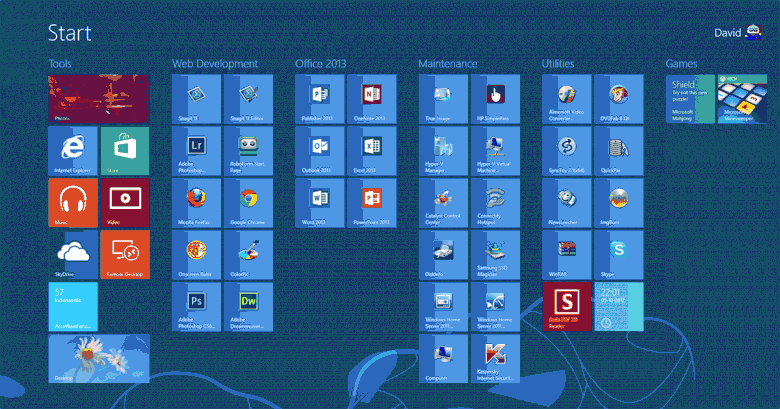
I hope you’ll agree that the Start Screen is an able replacement for the old Start Menu. With the amount of customization one can apply to the Start Screen is should be a useful and productive tool for anyone using Windows 8


And just when I was about to p**s of my trial version of W8 and Dave comes along and spoils it by making sense out of a shemozzle well it was a shemozzle to me anyway ,thanks Mate I will now persevere with my copy of 8 for a few weeks more at least …ejgippy from down under.