
In response to a reader’s request, here are several more basic yet (hopefully) useful tips. Just in case you think I might have gone bonkers repeating these oldies but goldies, please bear in mind that these tips are primarily for the benefit of migrating XP users with little or no experience running Windows 7:
How To: Pin Personal Folders to the Taskbar in Windows 7
XP users lament, the Quick Launch toolbar is no more! It’s not too difficult to recreate the popular XP toolbar in Windows 7, you can read instructions here: Resurrecting the ‘Quick Launch’ Toolbar, but seriously, the ability to “Pin” programs to the taskbar in Windows 7 more than compensates. Pinning programs to the taskbar is a very simple operation, especially if there is an associated desktop shortcut available – simply right click the shortcut and select Pin to Taskbar.
It’s just a tad more complicated for programs which do not have a desktop shortcut, you’ll need to hunt down the program’s executable, either via Start>All Programs or via the “Program Files” folder in the root of C drive, then right click on that and select Pin to Taskbar.
However, Microsoft did not see fit to include any such option for personal folders, such as Documents, Pictures, Downloads, etc. It can still be done though, and is not too difficult… here’s how:
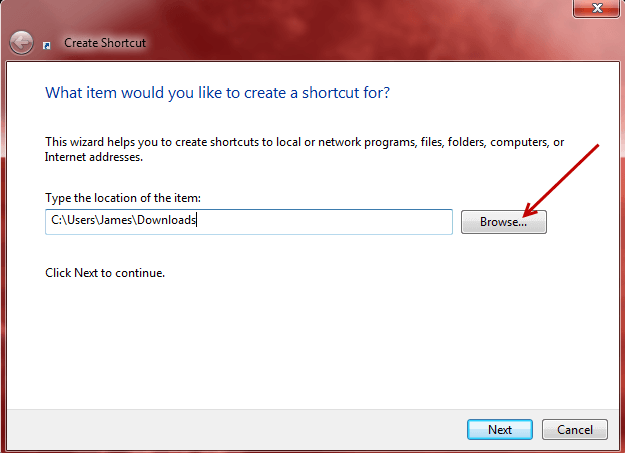
- Right click any blank space on the desktop and select New—->Shortcut
- In the ‘Create Shortcut’ window; click on the Browse button, navigate to the desired folder, click to highlight and then click OK
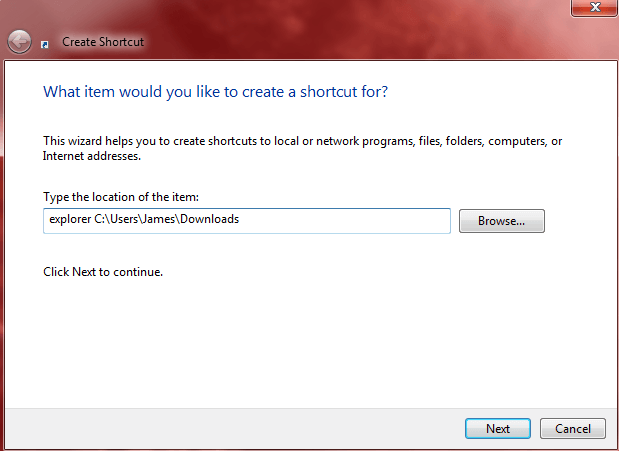
- You will now see the path to that folder in the location dialogue box. You will need to edit that path, just a simple edit. Add the word explorer right at the beginning, leaving a space between “explorer” and the path.
- Click Next and type in a suitable name – in this case “Downloads” will do fine – then click Finish.
- You will now have a new desktop shortcut with your chosen name. Simply right click the new shortcut and select Pin to Taskbar.
You can also change the shortcut’s icon if you like: Prior to pinning to the taskbar, right click the desktop shortcut and select Properties. Then, in the “Properties” window, click on the Change Icon button
![]()
When you have finished you can just delete the desktop shortcut.
How To: Access and use Problem Steps Recorder in Windows 7
Problem Steps Recorder is a great new inclusion to help troubleshoot issues in Windows 7, here’s how it works: Whenever an application or system component starts misbehaving, start Problem Steps Recorder and then work through whatever you were doing. Problem Steps Recorder will record every click and keystroke, take screen grabs, and package everything up into a single zipped MHTML* file ready for emailing to a support group or your friendly local computer guru.
It’s quick, easy and effective, plus can save hours of troubleshooting time. Here’s How:
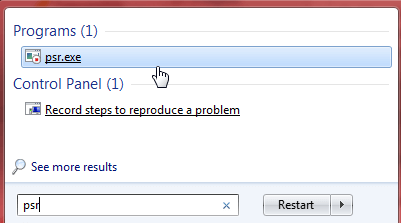
- Click Start and type PSR (upper or lower case, doesn’t matter) into the search box, then click on either of the two items (as shown) to run the recorder software:
- You will then see PSR’s simple interface appear on the screen

- Press the Start Record button and then go through the steps replicating the troublesome process, when you are finished just click the Stop Record button.
- A ‘Save As’ window will open with ‘Desktop’ as default save location. That can be changed to any folder you prefer but Desktop is as good as anywhere.
- Type in a suitable name for the file and then click Save.
- The resulting file can be opened by anyone with Internet Explorer, so is very universal.
*You can Read more about MHTML HERE.
How To: Access additional ‘Send To’ options in Windows 7
We are all familiar with the ‘Send To’ option included in the right click context menu but there is an expanded ‘Send To’ menu available in Windows 7 which is easily accessible and includes many more destinations. Here’s how:
- Simply press the Shift key when right clicking on a file, then open the Send to menu as per normal.
How To: Hide/Show Icons in the Notification Area in Windows 7
The notification area (aka system tray), at the far right of the taskbar has undergone some minor changes in Windows 7. The Notification Area no longer expands laterally to display hidden icons, clicking on the ‘Show hidden icons’ button will now open up a separate little window which sits just above the taskbar:

Windows 7 will hide many of these icons by default but it is a simple process for users to choose whether or not to hide an icon or display it permanently in the Notification Area. Here’s How:
- Click on the Show hidden icons button and then click Customize. You will now see a list of all application and system icons displayed in the notification area along with associated drop down menus:

Simply select whichever is your preferred behavior for each icon:
- Show icon and notifications = Display icon permanently
- Hide icon and notifications = Hide icon permanently
- Only show Notifications = Hide icon generally but show icon if there is any associated activity (e.g. updates, new mail, etc.)
*You will also notice the checkbox at the bottom of the window which enables an option to permanently display all icons.
How To: Manage ‘Action Center’ in Windows 7
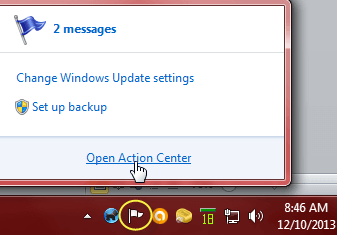
‘Action Center’ in Windows 7 is a neat addition which helps keep users informed of the status of important system components such as security and updates. However, at times there can be a discrepancy between what Windows believes is important and what is actually important to the user. For example: Action Center will display a message when automatic updates is not switched on, or if Windows built-in backup system hasn’t been utilized (as you will see in the next screenshot).
It’s very easy to manage these message settings… here’s how:
- Click on the Action Center icon in the system tray and then click Open Action Center
- Alternatively; go to Start>Control Panel>Action Center
- In the new window click on Change Action Center settings in the left hand panel to access message options:
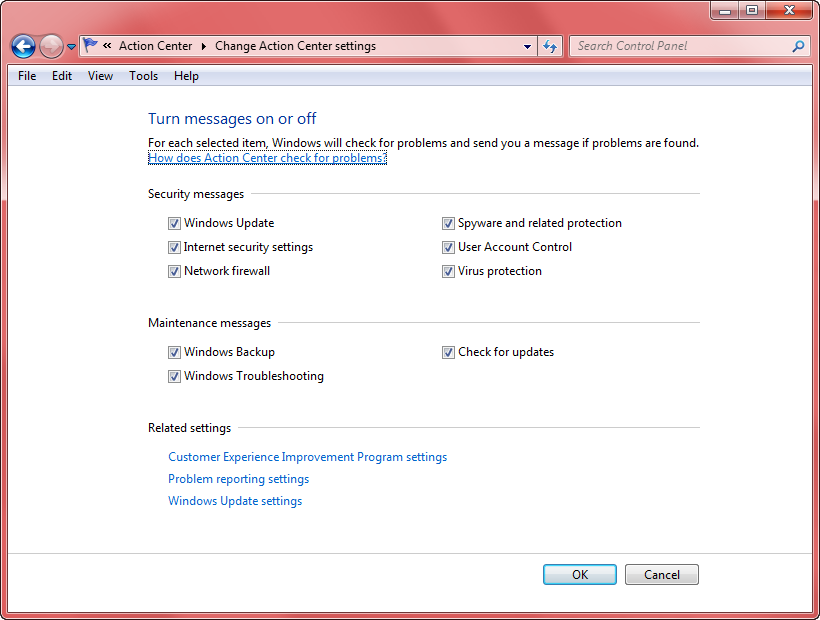
I would generally advise against turning off Security related messages. However, there may be circumstances where you need to turn off annoying invalid messages. For example; if you are absolutely certain that your virus definitions are completely up-to-date yet Action Center keeps telling you they are not (it can and does happen).