When you add an illustration to your document that has text, you will need to determine just how you would like your text to flow around your illustration. It depends on the type of illustration you are using. By default, Word will either place it on top of your text or in line with your text. Because shapes are drawn using a click-and-drag method, they are not placed at the insertion point in your document. Instead, they are placed wherever you choose to make your first click to begin drawing your shape.
The default wrap text could be exactly what you want, but regardless of what type of illustration you are using, there are several different methods that you can use to wrap your text around your illustration.
Follow the steps below to learn how:
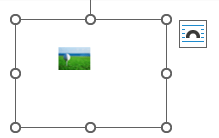
- To see the list of Wrap Text options, you must have your illustration selected. You will know it has been selected if you see a bounding box with small white dots or handles around your illustration.
- Now, a contextual tab should appear on your Ribbon (depending on your type of illustration, be it a picture, graphic, or shape format). On your Ribbon in the Arrange group, you will see a Wrap Text option, which is where you will find various Wrap Text options:
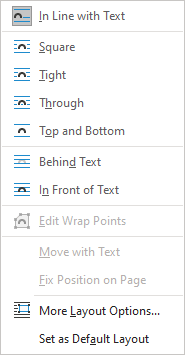
There are seven options listed:
- In Line with Text – This is the default option. If you select this option, your illustration will be placed on the line at the insertion point as if it were more text. The image will move along the line as you add more text
- Square – With this option selected, your text will flow around your image in a square
- Tight – This option will bring your text tight to your image while following the shape of the wrap points around your illustration
- Through – This is very similar to Tight and most often will be indistinguishable. Text will fill the gaps in your image if your image has a transparent background
- Top and Bottom – This will place your image on its own line and your text will appear above and below your image
- Behind Text – This will place your image behind your text on a separate layer (i.e., a watermark)
- In Front of Text – This is the default option for shapes and 3D models. Your image will appear on top of your text on a separate layer and may obscure it
- The Wrap text option can also be found by tapping the Wrap Text icon in the top right-hand corner of your selected image

- The images in this menu will give you a visual indication of how your text will wrap around your image. It will also show a tooltip when you hover your mouse over one of the Wrap text options.
Coming up next – A more detailed look at these options. Be on the lookout!
—