How To Manage Checkboxes In Word
Have you ever wanted to have the ability to add a checkbox in a document? Word will not only let you add checkboxes but move, delete, and manage how they appear, even if you downloaded a page from the internet.
If you plan on printing the document, the end-user can put a check or X in the box on paper. However, if you intend to use the document as an electronic document and email or share it with others, they may use their mouse to check or uncheck the box.
To accomplish this, there is a little-used option in Word called the Developer tab. It is the only way to insert functioning checkboxes in an electronic document. These are often referred to as Content Control Functions because the end-user gets to control the function. Besides Checkboxes, there are other Content Functions like Date Pickers, Drop Down lists, and others. This article discusses only the Check Box feature. I will be covering others in follow-up articles.
The Developer Tab
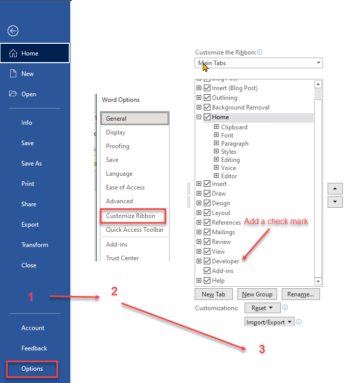
To access this feature, you must first have the Developer tab available in the Ribbon Toolbar at the top of the screen. If you do not see the Developer tab, you may add it by either of the following two methods: First, select “File” then “Options” and select “Customize Ribbon”. Under the Main Tabs section, put a checkmark in the Developer option. Hit OK to close the dialog box.
You may also right-click on the tab menu above the ribbon bar and select “Customize Ribbon” which will bring you to step three in the above graphic.
 When you return to your document you will have the developer tab available to you. Any time you access the developer tab you will not only be able to add new checkboxes but have complete control of any checkboxes already in a document. It is an easy matter to Add, Modify, Delete or Move any checkbox.
Inserting Checkboxes
To try it out. Place your cursor on the area where you wish to place the checkbox. Select the Developer tab and then in the Control section, select the Check Box. This will insert a new checkbox at the cursor’s location.
Managing Checkboxes
Unlike most items in Word, checkboxes are managed differently when trying to copy and paste or move the checkbox. When you are creating the document once the checkbox is placed and it is selected, it will function as you expect. It will place a checkmark in the box or remove a checkmark if one is already there. However, once selected, a grey box with three dots will appear. You can select the three dots, to allow you to copy, move, or delete the checkbox.
Properties
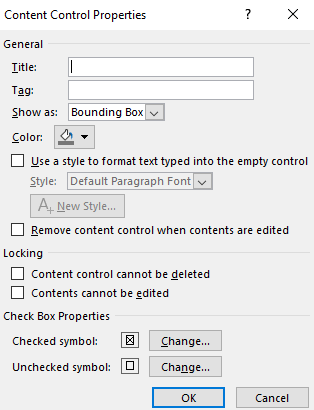
As mentioned earlier, Checkboxes are just one of the Content Control features available from the Developers Tab. There are several Properties associated with each Content Control feature and they are used to define exactly how the end-user will see, and manage the Content Control, in our case the Check box. Once you add a check box, the Properties option will appear in the Controls menu.
There are additional properties you can add to a Checkbox like giving it a label that will appear when the end-user moves the cursor over it. You can choose to lock the Checkbox from being deleted or edited and add or remove other properties.
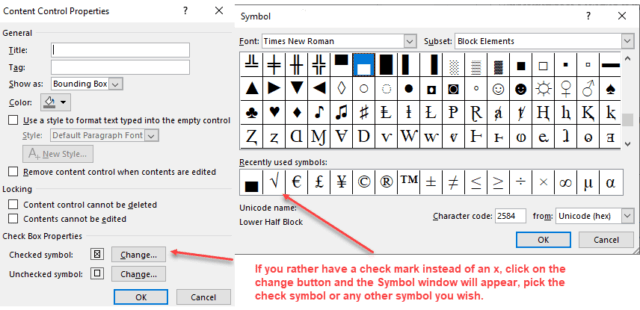
Note: “X” is the default symbol for Checkboxes. If you prefer to see a “checkmark” instead of an “X”, you may change it by going to the “Properties” section within the Developer Tab and select from a large range of symbols. 
Summary
Checkboxes can add a look of professionalism to your document. They are great for gathering surveys from a group of people and while used frequently in business documents, they can be included in email to family and friends. In the example below, the document creator wanted a quick way to know the time most of his family wanted to leave for Sunday’s outing.
☐ 6:00 am ☒7:00 am ☐ 8:00 am
You can place checkboxes in a row as shown above or in a column or a single checkbox within a paragraph. Use your imagination. If you have used or plan to use checkboxes in your documents in a new way, I would love to have you leave a comment.
—


