Folks who are not in the know often make the mistake of creating new sections or pages by simply hitting their Enter key repeatedly until they have created the appearance of a new page or a new section in their document. It drives me crazy when I get a document to work on and encounter this. It wastes so much time and keystrokes. I am all about getting things done well and quickly.
The problem with this method is that if you or anyone else goes back and edits a previous paragraph in the document or inserts a picture or resizes anything that appears before all those carriage returns, all that space just shifts to an unintended spot in the document.
So you need to know that a break is different than just hitting the Enter key on your keyboard. As a matter of fact, should you open any Word document and enable the Show/Hide feature, you will see all of the hidden formatting marks (non-printing characters) in any Word document to view all spaces, pilcrows (paragraph marks), and even section breaks that appear in that document.
If your formatting marks are visible, all spaces will appear as tiny little dots between each word. Section breaks though, will appear inside dotted lines with the words Section Break and then the kind of break following in parentheses.
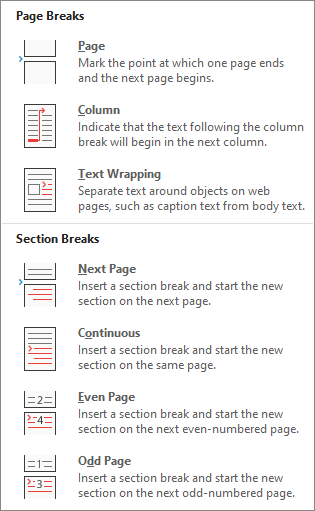
There are two basic types you can create in Word: Page breaks and section breaks. Page breaks are usually the sort that most people are familiar with and the most popular. But, there are other sorts of page breaks as well: column and text wrapping. A column break is used to stop the text in one column and continue the text at the beginning of your next column. A text wrapping break will separate text around objects on web pages. Those three breaks are the kinds of page breaks you will find in Word. All of this brings us to creating a page break and creating a section break.
Follow the steps below to learn how:
- Once your document is finished and you have decided which type of break will work for you, save your document.
- First, you will need to move your insertion point to where you would like your break to start.
- Next, you must navigate to the layout tab and Breaks, which will open the Breaks menu.
- Toward the very top, you will see Page. Click on that to insert a page break.
That was easy, wasn’t it? Now we can move on to the section breaks. In addition to the section break we talked about previously, which creates a new section and continues text on the same page, there are also several other kinds of section breaks, including next page break, even page section break, and odd page section break.
Why you might ask why all these breaks are a necessity? The answer is that section breaks are useful at times when you want a portion of your document to have a different look and stand out more than the rest. Sections can have their own look, including their own page orientations, layouts, and even their headers and footers, as well as other formatting.
Follow the steps below to learn how to insert a section break:
- Move your insertion point to where you would like your break to start.
- In the Layout tab, click Breaks. This will open the Breaks menu.

- Toward the middle of the menu, you will see Section Breaks:
- Click on Continuous to insert a continuous section break.
I will have more about page orientation in upcoming posts. I hope you are waiting with bated breath!
—
While you’re at it, can you clarify wrapping text in a WORD document around an image? When I want my multi-line text to be to the right or left of an image that I inserted, I sometimes find it challenging to get the text to stay where I want it.
Hi Dan,
Good point. I will attempt to do a post on that topic in the very near future. Thanks for the inspiration!
Carol