*PLEASE NOTE: This process requires a second internal hard drive. If you haven’t got a spare hard drive or are not prepared to purchase one, then this guide is probably not for you. This guide also assumes that the reader has a little advanced knowledge. The process itself is not that difficult, however, if every single step were to be explained in detail, it would take a small novel.
What You Will Need
- 1 x Existing internal hard drive running either genuine Windows 7 or genuine Windows 8.1
- 1 x Second internal hard drive – plus additional SATA cable and 4-pin male molex to SATA power connector (if required). See here: Layman’s Tech: Power Supply Units
- Image backup software – if you don’t have an image backup program already installed, I would recommend Aomei Backupper Standard (free)
- Bootable media created from within your image backup software
The Process
If your existing setup includes only one internal hard drive: with the PC shut down and powered off, install and connect the second internal hard drive. Now power up and boot into your operating system as per normal. If the second drive is brand new, or never been used, you’ll need to access Disk Management, then initiate and format the drive.
Create a system image. Now, make sure your existing operating system and all installed programs are up-to-date, then run your imaging software and create a full system image (storing the image on external hard drive). Here’s a guide to creating a full system image using Aomei Backupper Standard: How To Create Full System Images with Aomei Backupper.
Now we are going to restore the image backup to the second internal hard drive. Once the image creation is completed, load up the bootable media you’ve created from within the imaging program – either place your bootable CD/DVD in the optical drive or connect your bootable USB flash drive – shut down the system and power off the PC.
Disconnect the first internal hard drive (the one on which the existing operating system is currently installed) – you can just disconnect either the SATA or power cable, or both. Then turn the power back on and start up the PC.
You may need to change the boot preference in order to boot from the bootable media: on most older (BIOS) systems tapping the F10 key will bring up the boot preference menu. On most newer (UEFI) systems, tapping the F12 key will bring up the same menu. Use the arrow keys to highlight the source of the bootable media and then hit Enter.
Your imaging program should now load. Select the Restore option and restore the image you created earlier to the second (empty) hard drive. When the restoration process has completed, remove the bootable media and restart – usually just closing out the imaging program will cause a restart. Your original operating system should now boot from the second hard drive.

Next, upgrade that system to Windows 10. This will take a while and the system will reboot several times. Once the upgrade has completed and Windows 10 is good to go, you should be able to restart the system and it will now boot into Windows 10.
Reconnect the original hard drive. When you are satisfied that Windows 10 is up and running fine, shut down the system and power off the PC. Now reconnect the first (original) hard drive, then power up and start the PC. From here, you can now choose which operating system to load, either your older Windows 7/8.1 operating system or the new Windows 10, via the boot preference menu as mentioned earlier.
If you started off the process with a genuine activated Windows, both operating systems should be fully activated. The beauty of this method is that the new Windows 10 operating system mirrors your older operating system, including all installed programs (depending on compatibility) plus all your personal data, etc. Plus, of course, you can fully check out Windows 10 while still retaining your original operating system.
Dual Boot
I would recommend leaving the two operating systems separate and using the boot preference menu to select which one to load – this will eliminate complications if/when you might decide to get rid of one operating system or the other. It will also help avoid a number of common issues when dual booting with Windows 10. However, if you would prefer a dual boot menu, EasyBCD is free, simple, and effective – just make sure to set a timer count down, otherwise you won’t get to see the dual boot menu and make a selection:
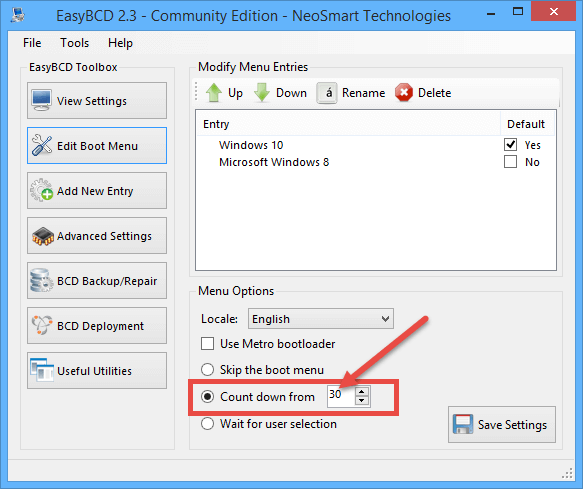
NOTE: Downloading the free edition of EasyBCD from the developer requires registration. If you’d prefer not to register, it may be available from your preferred download portal. I searched for and located the download on the following portals:
- Softpedia: Download EasyBCD
- FreewareFiles: Download Easy BCD
- LO4D.com: Download EasyBCD
—
Some good points Jim. Would like to add that it is not always easy to add another spinner drive to some of the old off the shelf retail PC’s. But an SSD can be very easily attached somewhere in the case. I have even used velcro tabs and piggbacked them onto the installed HD.
Keeping W10 on a separate HD, NOT IN DUAL BOOT, is very wise, one will see how less one will use W7 once W10 is up and running. On my PC’s I have to use F10 to access the boot menu, no OS is shown, only HD’s and their respective serial numbers, so I make a little sticky note and record the HD numbers to the OS installed. I have one PC that is running XP, Vista and W7 on separate HD’s although one is an SanDisk SSD, and one pf my PC’s is running W10 and W7.
If one has the option then this will work and in my opinion a whole lot better than a dual boot. Can’t stress enough the need to image the OS one wants to keep, even if you do not plan on keeping the OS. Good article Jim.
One more final note on this article. The motherboards I have, have six sata ports and in order to make W10 the default boot drive I have had to make sure it is plugged into sata port 0. This may have been because W10 is installed on a SSD but the machines would default to a spinner drive, but using sata port 0 for the SSD has solved the problem. Have fun with this.
Nice article. Here’s what I did.
With an external hard drive and Macrium Reflect (free version):
> I imaged my laptop’s Windows 7 and saved that image file on the external hard drive
> Did a clean install on Windows 10
> Imaged my Windows 10 installation to my external hard drive
Now, I use that external hard drive and Macrium Reflect to swap between the two operating systems. The process may be a little less complicated than dual booting. And I agree with dandl: The more I use Win10, the less I find myself swapping back to Win7 on my laptop. (Still keeping Win7 Pro on my gaming desktop!)
Jim,
Nice article, thx. One point that makes no sense to me is all the steps you go thru to get a copy of your original OS onto the secondary drive (ie, creating an image onto an external drive, disconnecting the primary drive, restoring the image, etc.)
Since you created bootable media with Aomei Backupper why not simply install the secondary drive, boot into Aomei, and CLONE your primary (Win7/Win8) drive directly onto the blank secondary drive? If the drives are the same size, no problem. If the secondary drive is larger, no problem. If the secondary drive is smaller, still no problem as long as it is large enough to hold the OS/programs/data files from the primary (which would be the same requirement if you went the “image” backup route as in your article).
Once that’s done the rest of your steps (disconnecting primary, booting into secondary, upgrading to Windows10, etc.) will still have to be performed.
Two reasons why imaging is preferable to cloning:
1) Cloning does not leave you with a saved image of your original OS in case of problems/mistakes.
2) Not all free imaging programs support a cloning feature. And, even if they do, the feature doesn’t always support cloning to a smaller hard drive. With Aomei Backupper Standard (free), for example, the cloning feature is not available by default and needs to be activated by sharing on social media.
These are issues which can be overcome but, for a general guide such as this one, the imaging option is hassle free.
1) True, cloning as I described it doesn’t leave you with a separate backup but the method you described requires that you have a spare external drive as a temporary storage for the saved image. And if you want to keep that saved image in case of problems/mistakes you have to dedicate that external drive to permanent storage. Anyway, that’s a backup issue that can be addressed many different ways.
2) True, not all free imaging software supports a cloning feature but the one you mentioned Aomei does. And it supports cloning to a smaller hard drive. I’ve been using Aomei for years and here’s a tip — the cloning feature only needs to be activated by sharing on social media to be used on the DESKTOP version. But when you use the program to create bootable media it automatically activates the cloning feature.
In any case I understand your points regarding imaging and see it as a matter of taste. In this instance I prefer cloning as it eliminates the intermediate “restore” step along with not requiring the additional external hard drive.
One other point, while it’s true as you mentioned that this method mirrors your old OS (along with programs and data) the moment you install a new program or create/edit a data file in one OS it’s not accessible in the other (ie, you create it in Win7 you won’t be able to access it in Win10 or vice versa). That’s the beauty of dual-boot which admittedly has it’s own complications (I know as I used System Commander for many years multi-booting DOS, 95, 98, NT and 2000). I notice over at the EasyBCD website they don’t officially support Windows 10 as either a Host or Destination OS (see link below) but say it may work. If you have been successful dual-booting with it please write an article as I’m sure that would be of interest to many here at DCT.
https://neosmart.net/wiki/easybcd/supported-operating-systems/
Rich, I don’t know where you a getting this information from but it is definitely not accurate… or I am misinterpreting what you are saying.
Access to programs and data is exactly the same in either scenario. Newly installed programs in one OS are not available to the second OS regardless of dual boot or not. And, in both cases, all data can be accessed from either OS.
EasyBCD works fine with Windows 10. I am using EasyBCD to dual boot Windows 10 and Windows 8.1 on an older machine, no problem. Check out the home page here: https://neosmart.net/EasyBCD/. It clearly states “Windows 10 and UEFI ready”.
Hi Rich
Makes me wonder when that page was last updated? I also have used Easy BCD to dual boot with W10, I no longer use it simply because I do not want any other OS tied to W10 through the bootloader. It is very easy to setup but it is also very easy to screw up trying to undo a dual boot.
I like Jim’s method of upgrading to a free copy of Win10 on a second HDD that originally had a dupe of genuine Win7 (or Win8.1). It’s nice ‘n clean and keeps the two O/S’s on physically separate drives. However I also like to tinker and this question is to those (like Jim and dandl) who have successfully setup a dual-boot with both O/S’s on the same HDD.
Let’s say I have partitioned a drive where C: is 100GB with genuine Win7 installed. D: is 100GB and is blank and formatted NTFS. E: was created from the remainder of the unallocated space on the drive and it contains the majority of my programs and data. I would like to use EasyBCD to manage the boot-loaders.
The question is when I go to install my free copy of Win10 onto that single drive and it detects the genuine Win7 on C: does it then require that I install Win10 on top of Win7 (in order to qualify for the free upgrade) or would it permit me to then install Win10 on the blank D: and still qualify for the free upgrade? Having not used EasyBCD I would have to dig into it to see where it would come into play in this scenario, but there’s no point in me going any further if the free Win10 upgrade forces me to install it in the same partition as the qualifying genuine Win7.
Hope that makes sense, any tips would be much appreciated.
I do believe the W10 free upgrade will overwrite the W7 partition. The big ? here is if you use W7 for the free upgrade will that product key still be good to run both W7 and W10.
In such dual boot method , the system goes in to a perpetual disk check mode. To prevent this ,the Fast Boot in both OSs should be deactivated. Terry Hollett has written an article about it in DCT. I could do the proper dual boot only after following the steps mentioned by Terry in his article..
Which takes more time , Cloning the Partition or Restoring the Image Backup?
Which is faster , Cloning the Partition or Restoring the Image ??
In my case such a dual boot , went in to perpetual Disk Check mode when I boot in to the 2nd OS. So the remedy was to deactivate the Fast Boot of both the OSs. Terry Hollett has written an article in DCT , I followed those steps to get the Dual boot in order
How about triple boot? I had already installed PCLinuxOS on a second sata drive and like it. I could see Win 10 had loaded all the amunition to blow 7 so I kept it offline and then cloned it to a 3rd sata drive and then told 10 to march in. Everything is working fine with Linux #1 boot and it can bring up both Win drives in Dolfin File Mgr. I don.t intend to put 7 on line as I suspect there could be authentication problems. I was driven by paranoia over data issues with my metered 5 gigs. So from here it remains to be seen.
I to am also led to believe their may be authentication issues if one takes the free upgrade and then tries to run whatever OS the free upgrade replaced. All my upgrades were through W8.1 and not W7. I do still run W7 Home Premium but it will never be upgraded to W10. For the record I hardly ever use W7, it is just occupying space on a hard drive.
I thought about that too dandl, but Jim did say, “If you started off the process with a genuine activated Windows, BOTH OPERATING SYSTEMS SHOULD BE FULLY ACTIVATED [my emphasis]” So he is clearly implying that you will have access to both O/S’s in perpetuity with no authentication issues. In fact, if you don’t have full access to both then the whole method described in this article is of no value.
Hi Rich
What you are saying is true and I am sure Mr Jim has already tried this but the whole purpose of the W10 free upgrade is to get users off of W7, W8 & W8.1. It was not intended to be used as a means to create a PC using dual boot to run both OS’s. If you wish to explorer this option then try not wrecking your PC doing so.
I am not “implying” anything, I am stating a fact. I have gone through this process many times and would not be writing about it if I didn’t know exactly what I was talking about.
Quite frankly, all this conjecturing is not helping anyone.
Jim,
How come an external drive cannot be used?
Is a USB connection too slow?
Dan