I’m a big gamer if you did not know. I have a PS4, Xbox One and many of the older systems because I’m a geek when it comes to gaming. The reason I bring up my gaming addiction is on my PS4 I pay yearly for the PlayStation Plus account. Since it comes up every year, I have a Credit Card set on my account to automatically pay for this service. This got me thinking that I might need to update that payment method this year. Many of us might be in the same boat. I figured if I needed to do this, I would show with all of you how you could do it, too. I will be showing you how to do this on your Console and on the PlayStation website. Let us start with our console first.
How To Update PlayStation Payment Method
Method One: How to do this on the PS4
Step 1: Once you have your PS4 turned on, head up to the top right. You are looking for the Settings option. Select it.
Step 2: Under Settings, you will need to find the Account Management option from the menu. Select it.
Step 3: On the Account Management screen select the Account Information which is the second one down from the top. Select it.
Step 4: Here you will be looking for the Wallet option. This is where you can find the payment method link. Select it.
Step 5: Now that we are on the Wallet screen, select the Payment Methods option at the top of the menu. Select it.
Step 6: After selecting the Payment Methods, you should get the Enter Your Password screen. Select the Password box. You will get an on-screen keyboard to enter the password. Once done, select the Done button at the bottom right.
After the password is entered, select the Continue button.
Step 7: We are now inside the Payment Method screen. Here, you can select your current card, Add a PayPal Account, or Add a new Credit/Debit card. For this article, we will select the Edit Current Card at the top.
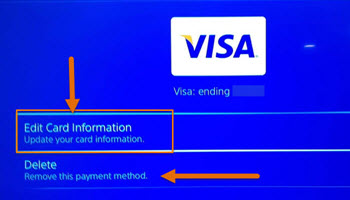
Step 8: Here we are on the Edit Card Information page for your current card. You can edit the card information or delete the card altogether. Let us choose Edit Card Information for this article.
Step 9: The next thing to do is update the card info and then select the Next button at the bottom of the screen.
Step 10: Now the final step is to fill out all the new billing information. Once done, select Save at the bottom of the screen. Done!
That is how you can update the credit card on your PS4 console. Now it is time to show you how another way.
Method 2: How you can do this on the PlayStation website. I’m using a Windows PC with Google Chrome to show you this process.
Step 1: On your internet browser head on over to the PlayStation Website. Once on the website, look to the top right and click Sign in.
Step 2: Once you have signed in, look to the top right for your profile image. Hover over it or click it. This will bring up the drop-down menu. From the menu select the Payment Management link. Click it.
Step 3: You might be asked to enter your login information again before the next screen appears. On the Payment Settings screen, you can either edit the card on file, Add a new payment method, or add funds to your wallet. In this article, we will update and edit the card on file. To do this, click on the Credit Card you already have on this account under Payment Method.
Step 4: Once here, you can either Remove the card or edit the information on the card.
That is how easy it is to update that payment method on your PS4 console on the website.
—

