


One of the new features in Word 2010 is a provision that allows you to take screenshots and paste them directly into your Word document. This feature can be very helpful especially if you create technical manuals or educational manuals. I know when I do my training classes in law firms, it is very helpful to my students to have screenshots of what I am explaining. We all learn in different ways and some folks need visuals as well as the written word.
There was a Snipping Tool available starting with Windows Vista but it is now available on the MS Word Ribbon.
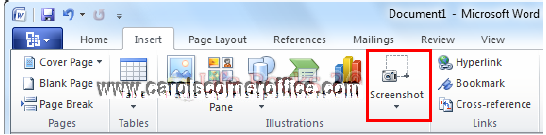
Follow the steps below to learn how to take a screenshot in version 2010:
- On the Insert tab on the Ribbon, you will see the Screenshot option.
- When you click the Screenshot button, a dialog box will display all existing active windows that are running. If you want to select a screenshot of a particular area, select the link at the bottom.
Once you take your screenshot, the image will automatically be pasted into your document and you can do basic editing with the picture tool that is available in Word 2010.
I think you will agree that Screenshot is a very useful feature in the latest version of Word!

