Stopping The UAC Prompt At Startup
I would first like to state that bypassing the entire User Account Control (UAC) is almost never a good idea. It is there for an exceptionally good reason and that is to prevent unauthorized access to programs that can directly or indirectly modify your system settings. It is by no means foolproof but most malware will be blocked.
If something can modify your system, it can add malware like keyloggers, ransomware, or even download viruses that can email your family, friends, and viruses to them. Your system’s default state is to have it enabled.
When you download a new program that can access system settings you want a visible warning just in case you really didn’t mean to install it. Some built-in programs like the Registry Editor, Command Prompt, or any program opened in Administrator Mode will open the UAC prompt and that is how it should be.
Good Reasons For Disabling The UAC
However, when warnings like the UAC prompt pop up all the time we can become immune to their warning and automatically click on the “OK” button. I have fixed countless computers because of individuals accidentally approving an action without taking the time to understand the ramifications. That to me is the best reason for disabling the UAC for “Specific Programs” only.
Don’t Desensitize Yourself
Some programs I know are safe and used regularly will open the UAC prompt every time I try to open the program. For example, I use TechSmith’s “Snagit” and VoidTool’s “Everything Search” every day. Check out Marc’s article on how to use Everything. I don’t want to be warned every time they are opened because I already use and trust these programs. If I get used to quickly clicking on “OK when I see a warning, I might quickly click on one I shouldn’t. To avoid this, I remove the warning from my safe programs so that when a warning appears, my first thought is to double-check and make sure this program should be opened.
Disable UAC For Specific Programs
There are third-party programs that can disable all UAC notifications and for specific programs but to me, the best way to ensure you are safe is to do it within Windows by using the built-in Task Scheduler. In this Part 1, I will be covering how to create a Basic Task using the built-in Task Scheduler in Windows.
Task Scheduler
This little-known Windows program has been with us since Windows XP. It is a surprisingly easy program to use and has a lot of uses. In this article, I will be covering how to run programs in an “elevated” mode, more commonly known as running with administrative permission. You may schedule a specific program or a group of programs and elevate them when the computer boots up or when you sign in if the computer has more than one user.
Create A Basic Task
Creating a basic task is easy and straightforward. The basic task module will walk you through each step when clicking on the “Next” key. When you are finished, it will automatically enter the task into your startup or if you prefer, only when you sign in with administrative privileges. Even if another user has administrative privileges, the program will not start until you sign in. You can set specific triggers other than startup including setting specific times when a specific event is logged or having it trigger only one time.
- Click on the Windows Start button and type “task scheduler” or use Windows 10’s search in the Taskbar
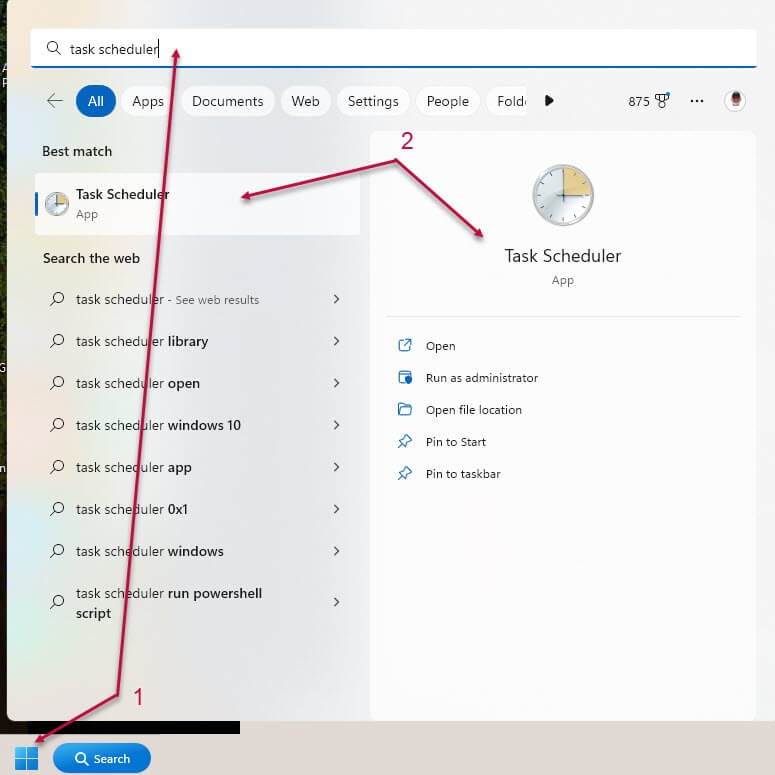
- Click on the Task Scheduler App
- Click on Action in the toolbar
- Select “Create A Basic Task” in the drop-down menu
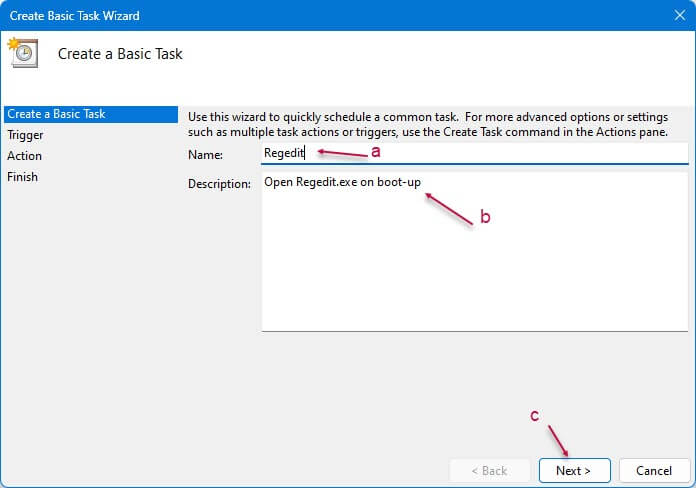
 This will open the Create Basic Task Wizard
- a – Give the task a name
- b – Enter a Description (optional)
- c – Click “Next”
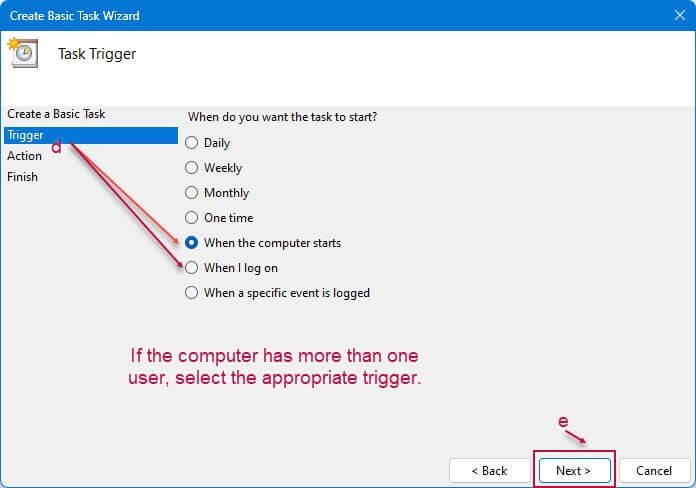
- d – Select the “Trigger” to determine when the task will run
- e – Click “Next”
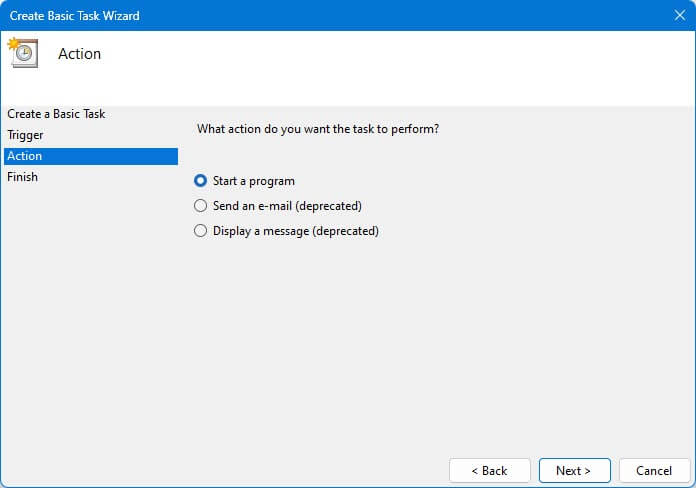
- f – In the Action menu
- g – Choose “Start a program” as the action
- h – Click “Next”
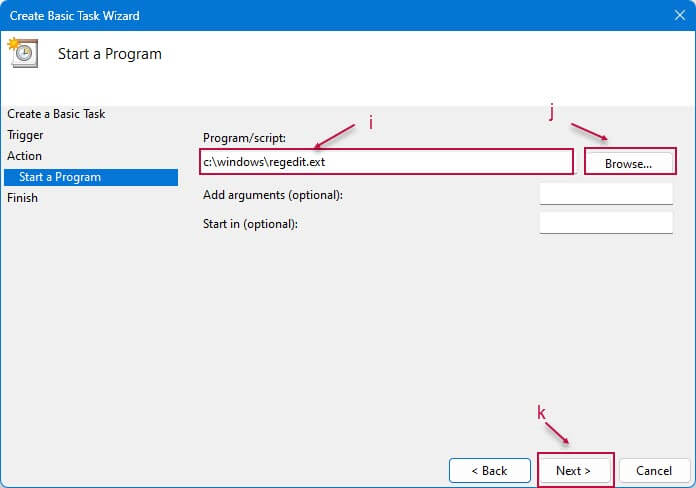
- i – Locate and enter the correct physical location of the program
- j – If you are not sure, use the Browse option to locate the program
- k – Click “Next”
Review the Summary and choose “Finish” to add the task to your Windows schedule.
Summary
Elevating a task to prevent the UAC Prompt from appearing for trusted programs you use regularly will mean that clicking on the same icon you used before will now open without any warning. In Part 2 of this series, I will cover how to create a task that will allow you to open a program on demand.
- How To Stop UAC With Task Scheduler – Part 1 ⬅ You are here
- How To Stop UAC With Task Scheduler – Part 2
Mine has been disabled since Windows XP!!!!!
Hi Daniel, Is that by choice? I am not aware of any reason Task Scheduler would not work. It is virtually unchanged since its first release. Only minor cosmetic changes have been made. If you did not choose to disable it, I am sure I can help with a workaround.
Jim