It can, at times, be very difficult to get your head around Word’s page numbering options, particularly in a multiple-section document. Fortunately, controlling how your pages in each section are numbered is actually pretty easy.
To quote Microsoft, a section is ”a portion of a document in which you set certain page formatting options.” It may help you to think of sections as rooms in a house. They are all part of the whole house, but each room has its own purpose and style. This autonomy will lend flexibility, but it can also lead to questions about numbering pages (i.e., where do you start numbering, does each section start over with page 1, etc).
Fortunately, adding sections actually makes complex page numbering less, not more, difficult!
Determine Page Numbering Needs For Each Section
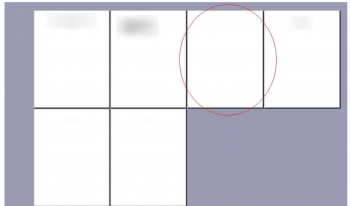
Before you can begin numbering, you must discern what each section comprises. The results will be specific to each document (i.e., a book may have several elements or sections: title page, table of contents, numerous chapters, etc.). Sections will allow you to treat each of these elements as a single unit.
Once you identify the sections, you must decide how you want to number each one: Where is page 1, will each section begin with page 1, and so on.
Follow the steps below to learn how to create your sections:
- Position your cursor between the two elements. If there is a page break between them, it is often easier to insert the section break at the end of your preceding page. Click Show/Hide to display formatting marks, if necessary.
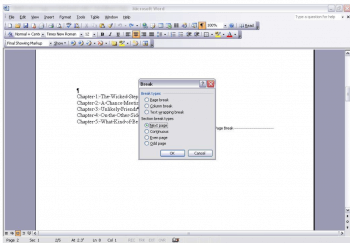
- From the Insert menu, select Break and choose Next Page in the Section Break Types section, as shown below.
- Click OK.
You can treat each of these as different sections.
Check for extra pages:
This is one instance when planning will be very handy. If you know you are going to divide your document into sections, insert section breaks instead of page breaks, although it is easy to delete extra pages.
Add a header or footer — perhaps
Most page numbers appear in a document’s header or footer section, although that is not always necessary. To add a header, select Header And Footer from your View menu. In versions 2007 and 2010, double-click above the top margin or click the Insert tab | Header in the Header & Footer group | Blank.
Enable Page Numbering
As mentioned above, page numbering does not always begin with your first page. For instance, you might want to avoid page numbering until the first page of Chapter 1. In this case, you would select the first page of Chapter 1 — that is also the first page of Section 2. Then, to enable page numbering for Chapter 1 and beyond, you would open the header (or footer, depending on where you want the page number to appear). On the Header And Footer toolbar that Word launches when you open a header or footer, click Insert Page Number. In Word 2007 and 2010, click Design | Page Number | Top of Page | Plain Number 1. The last two options are preferential.
Break the connection
As you learned above, page numbering is not by default, autonomous in sections. You must break the connection between the two sections.
Follow the steps below to learn how:
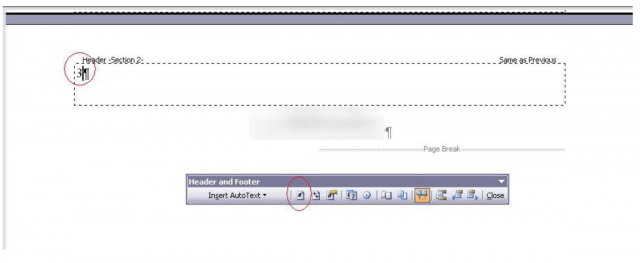
To break the connection between the first and second sections, click Link To Previous on the Header And Footer toolbar. If you closed the header in the last step, simply reopen it and Word will display the Header And Footer toolbar again. In Word 2007 and 2010, click Design | Link To Previous in the Navigation group.
The page number is still 3, but do not fret.
Reset page numbering
Breaking the connection is not enough; you must also reset the page numbering option.
Follow the steps below to learn how:
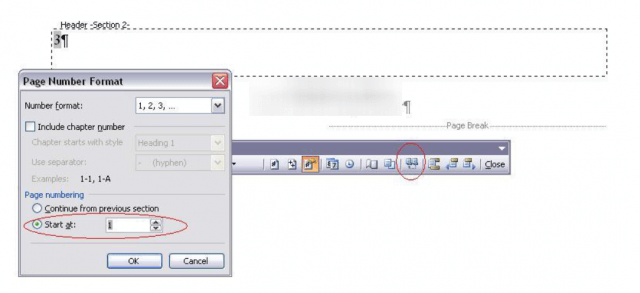
- On your Header And Footer toolbar, click Format Page Number. In versions 2007 and 2010, click the Design | Page Number | Format Page Number.
- In the dialog box, select the Start At option in the Page Number section. Enter 1, as shown below.
- Click OK. As you can see, the page number is now 1, even though this page is actually the third page in the document.
Reset page number for the current section.
After resetting the section’s page number, the first page of the section is 1.
Disable page numbering for the title page
Chapter 1 begins with page number 1 — that is good. But the first two pages of the document, the title page, and table of contents page, still display page numbers 1 and 2, respectively.
Follow the steps below to learn how to fix this:
- Go to the first page and open the header if necessary.
- Select the page number.
- Click Delete.
Note that deleting the page number field on Page 1 also deleted the page number field on Page 2. That is because these two pages are both parts of the same section.
Number the appendix
If you check your appendix page (page 4 in your document), you will see that it displays the page number 2. Also, the last page, the index, displays the number 3. As far as Word is concerned, the appendix and index pages are part of the second section, which begins with chapter 1. Right now, there is only one section break in your document.
There is an easy fix for this. Simply add a section break after the Chapter 1 section. Position the cursor at the end of the chapter and repeat the steps above. Unlike before, you do not have to break the connection and reset the page number because you changed those default settings earlier.
You will most likely want your index page to have its own page numbering, similar to the Chapter and Appendix section. So just make a section for your index by repeating the process above. Place your cursor at the end of your appendix and insert a section break!
Yes, it can bend your brain, but only if you let it. With these steps, you should be an expert in page numbering very soon!
—


Hello,
I am having an issue with numbering the chapters with individual pages (1-1, 1-2, 2-1, 2-2, etc). In my document I have a preface with page numbers i, ii, iii, iv, v). This section ends and then my first chapter begins using Heading 1 (which is linked to the Table of Contents). This is also set on a multi level list so the page numbers will set set based off of the chapter number.
The problem is that Chapter 1 (Which is set and titled as chapter 1) is showing a page number of 2-1 and I can not figure out how to get the numbers to read the correct chapter because each chapter is off by one (Chapter 1 reads 2-1, 2-2, 2-3 and Chapter 2 reads 3-1, 3-2, 3-3, etc).
I don’t think the issue is related to sections, because the start of Chapter 1 is in section 3 and the pages still read chapter 2-1.
Now from what I understand, the page numbers pull from a multi-level list, which is set and showing the correct chapter numbers, but for some reason the page formatting is not correctly pulling that information.
Do you have any ideas?
Thanks in advance
Tanner
A little more information for you here as well, Chapters 2 and 3 are showing the correct page and chapter numbers. So Chapter 2 reads page 2-1, 2-2, etc and same for chapter 3.
But for some reason ONLY chapter 1 is not showing the correct chapter. Really not sure what is causing this.
Thank you
Hi Tanner,
As you might imagine, your question is quite complex and as such, it is next to impossible for me to give you an answer without seeing everything you did in your document. I am sorry I cannot give you an answer, but this is really good fodder for an upcoming post and perhaps that will help you to resolve the issue you are having. Thank you for your patience!
No worries, I still haven’t found a fix to this one but i’m going to keep searching. Ill check back in if I find something to rememdy the issue.
Its got to be a funky setting hidden somewhere, because I am seeing the same issue on two different documents and its only Chapter 1 thats doing it.
Thanks