

![]()
If you have ever worked with sections, you know that when you delete a section break, the text before the break will then adopt the formatting characteristics of the section after the break. In some instances this may be what you actually wanted but, if you delete the last section break in your document, it can really be aggravating if you do not want the section before that to lose its formatting.
There is actually no way to delete section breaks and maintain the formatting in that section. There is, however, a work around.
Follow the steps below to learn how:
- Place your cursor at the end of your document, just after your final section break.
- If the section break just before the insertion point is a Continuous section break, click CTRL + Enter to insert a page break.
- Display the Insert tab of your Ribbon.
- In the Header & Footer group, click the Header tool and click Edit Header. Your header will be displayed with the insertion point in it.
- Be certain the Link to Previous control is selected for the header and footer.
- You can toggle between your header and footer using the Go to Footer and Go to Header tools. This will ensue that the final section in your document has the same header and footer as the section preceding it.
- Click the Close Header and Footer tool.
- Put your cursor just before the final section break.
- Display the Page Layout tab of your Ribbon.
- In your Page Setup group, click the small icon on the right to display the dialog box.

- Immediately click Enter or click OK.
- Place your cursor just after the final section break.
- Click F4. Word will apply the last section of the Page Setup formatting that you accepted above for your next to last section.
- Now place your cursor just before your final section break.
- Display the Page layout tab of your Ribbon.
- In the Page Setup group, click the Columns tool to display the dialog box.
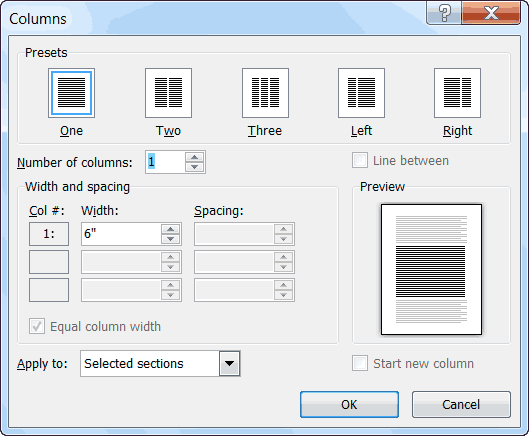
- Immediately click Enter or OK.
- Place your cursor just after your final section break.
- Click F4. Word will apply the column formatting that yo accepted above for your next to last section.
- Select and delete the page break that you inserted in your document above.
I am certain many of you will find this tip invaluable!


Thank you so much for that, I was struggling to get rid of this section break without messing up my documents formatting for ages, with your steps it took me 15min!
I am so glad to learn that my article has helped you! Thanks for the feedback!
There is a much more efficient way to do this. Before you start, take note of the settings under page layout for the section prior to the section break you wish to delete, in particular the “Different Odd/Even” and “Different First Page” settings. Then proceed as follows:
1. Go to the last page, after the section break. In the Page Layout settings, make sure they are set the same as they were for the previous section (especially the “Different First Page’ and “Different Odd/Even” settings).
2, Then go into the header, and click “Link to Previous,” and select “Yes” to the prompt that follows. Then click OFF the “Link to Previous” button.
3. Go into the footer and repeat the steps in #2.
4.. Close out of the header and footer.
5. Delete the section break.
Thanks Mark. Comments are always welcome. I love to hear the different ways that folks do things and I am always happy to hear of a more streamlined method!
Excellent!!! Thank you so much – this is invaluable!!
Glad to hear that this has been helpful to you! Thank you for the feedback!
Thank you!