
I spent a week or more trying to share a folder on my Linux laptop (Lubuntu) to my Windows network. I kind-of got it working, not the way I wanted, but good enough. So here are the steps I took to get as far as I did.
FYI:
sudo – Sudo stands for either “substitute user do” or “super user do”
When you type in a password in terminal, nothing is shown, not even stars but it’s still going in.
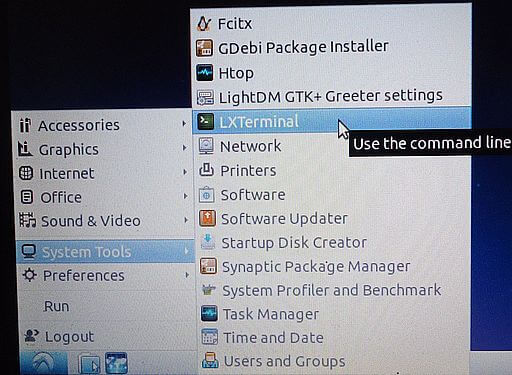
First, I had to open up the terminal by clicking on the Start button, then System Tools and then LXTerminal.
Then I typed in the following to download two different packages or programs: first Samba. Type the following in the terminal window and press enter.
sudo apt-get install samba

If it’s already installed it will tell you so. Otherwise, it will install and update if necessary. Then you need to set a password.
Type the following, substitute your own account user name for mine. Also, it is recommended that you use the same password for your shared folder as your main account password.
sudo smbpasswd -a terry
You will first have to type in your account password, then your new password for your shared folder then confirm it by typing it again.
Now let’s create our folder to share. This will make a folder on the desktop called Share.
mkdir ~/Desktop/Share
Now you need to open a file called smb.conf to edit it. Type the following and press enter. There are different editors for different distros. This is what works on mine.
sudo nano /etc/samba/smb.conf

Find these lines and edit the following:
In the [global] section almost at the top of the page, set your workgroup name.
workgroup = (your workgroup name)
Scroll down and look for the line that looks something like this:
# wins support = no
Remove the pound symbol (#) and change the no to yes.
Then scroll right down to the bottom of the file and add the following lines. Remember to put in your own account name and user name. And where I have [Share] put in the actual folder name that you are using in the brackets:
[Share]
path = /home/Terry/Desktop/Share
available = yes
valid users = terry
read only = no
browsable = yes
public = yes
writable = yes
Now you have to save this. I wasn’t sure how to do this at first. There is no File, Save option. But at the bottom of the editor, there is a menu with words and an arrow before it. I discovered that it represents the Ctrl key, so to save the file in this editor hold down the Ctrl key and press on the letter ‘O’.
Now to restart the service. In the terminal type: sudo service smbd restart
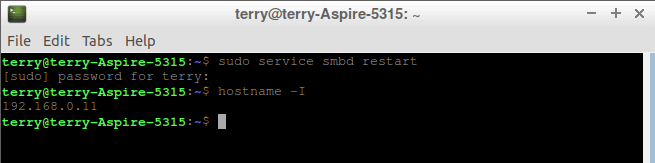
Your IP address at this point might come in handy. In the terminal just type: hostname -IP
Now you need to install cifs-utils.
sudo apt install cifs-utils
After all of this, I could see the shared folder from both my Windows 7 and 10 computers but neither could access the folder. You still need to follow those basic steps mentioned to set it up but I could only find one more solution online to try. I found a reference to mounting the Windows folder in the File Manager of Linux. They did not go into any detail about doing this.

In Lubuntu, I went to the File Manager. I couldn’t find any noticeable network references like folders or shortcuts so I clicked on Go, and then Network. I tried WHITE-PC (family computer) and it asked for a password that I didn’t have set up.
Next, I tried ASUS (Win10)-– it couldn’t make the connection.
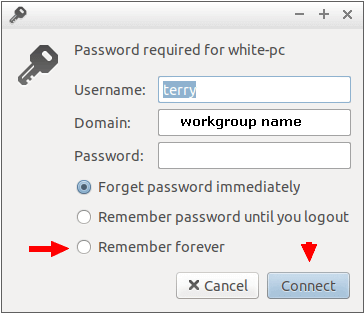
Finally, I tried ACER1 (Win7), It asked me to create a Keyring password. I did and then I had to confirm it. Then I got a password prompt to access the Windows 7 computer. I put in the username, workgroup (domain), and password. I also checked the option Remember forever because I don’t want to go through this again. Click on connect. It finally worked.
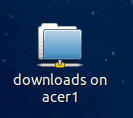
I can access the Windows 7 shared folder from Lubuntu but I still can’t access the Linux folder from Windows. Good enough, because I can use that one folder to copy files back and forth from one computer to the next on my network. Also, I noticed a new shortcut on my Lubuntu desktop called downloads on acer1. So, if I figure out the rest I’ll let you know. And if anybody with more experience would like to make some suggestions, just add them in the comments. And Thank You in advance.
—
Update: I figured out why I was still having sharing issues. My smb.conf was missing the following line: name resolve order = lmhosts host wins bcast
I added in the Global section and once I restarted the smbd service, I now can access my folders from either computer.
I boot one of my PC’s with Linux Mint and the other one with Linux Arch and unless I am, using Windows for playing games, that is where I spend most of my time. For general computing use, one would be surprised as to how little one really needs Windows. I would much rather dual boot an older machine with Linux, than install W10, that may or may not
work.
I have gotten samba share to work, a few times, but since my PC’s are not always both running, I find it easier to just drop the file on a usb stick.
Most users on DCT are Windows diehard fans, but without a Linux server, their may not even be a DCT or a lot of other servers.
Keep up the good work and keep the Linux how-to,s coming!!!!
I have seen that humming bird on Deepin. Where did you get for Lubuntu?