In an earlier post I told you how to automatically modify a style. Today I will show you how to modify an existing style. With this method, you do not even need to have text in a document to modify a style! Why? Because I think it is good to know how to do it both ways. They may be times (i.e., at work where you are not allowed to change styles automatically, etc.) I just think it is good practice to know how to do something more than one way. So let’s get to it shall we?
Follow the steps below to learn how:
-
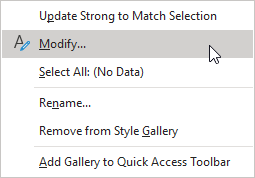
- On your Home tab, right-click any style in the Styles gallery and click Modify.
-
- In the Formatting section, make the formatting changes of your choosing, (i.e., font style, size, or color, alignment, line spacing, or indentation).
Select whether your style change will apply to the current document or to all future documents (see above).
As you can see, this method also is very easy to do.
—


