The OneDrive Flyout
OneDrive just got a new fly-out on some installations of Windows 10. Here is a comparison of the two:

The legacy fly-out displays a simple bit of information telling you how many files and their total size remaining to complete synchronization.
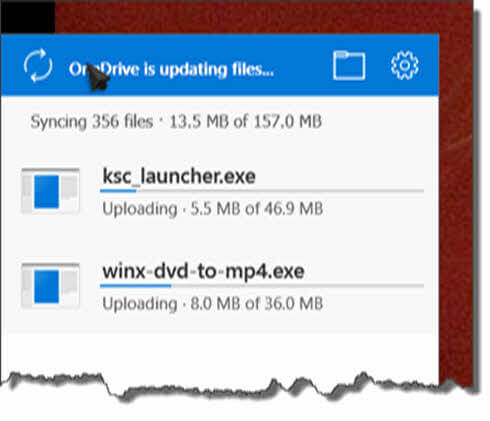
DropBox users will be familiar with the above screen shot. It not only shows the number of files remaining and their respective sizes, but also provides a scrollable list of those files and how far along each one has progressed in the transfer process.
Depending on which A/B test you are experiencing in the Windows 10 update process, you may or may not see the new fly-out. This does not mean you can’t enable or disable it if you choose. Here’s how…
How to Change Your OneDrive Fly-Out Settings
[message type=”warning”]
Standard Warning
The next few steps involve using the Windows Registry Editor. The standard warning is, before any changes are made to the Registry, Back It Up! If you don’t know how to do that, here is a Windows 10 Quick Tips post that will show you.
[/message]
[message type=”info”]
Open The Windows Registry Editor
- To open the Windows Registry Editor, use the Windows Key + R Hotkey combination to open a Run Box
- In the Run Box, type regedit and hit Enter or click the OK Button
[/message]
The Registry Editor
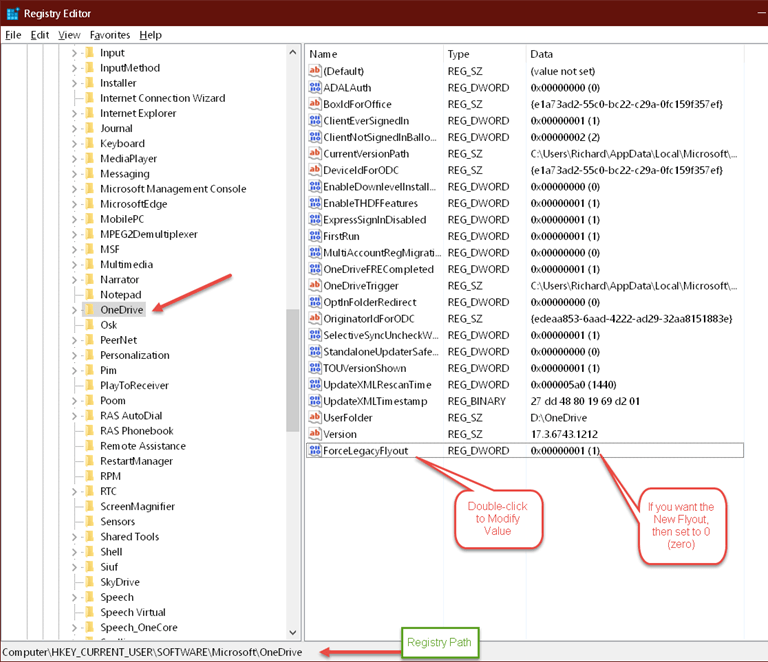
Note: You can click the above image to help with legibility problems.
Once you have the Registry Editor open, you will want to navigate the Tree View in the left panel until you arrive at the following path:
HKEY_CURRENT_USER\SOFTWARE\Microsoft\OneDrive
This path is also indicated in the screen shot.
Once there, you will be looking for a Value in the right panel labeled, ForceLegacyFlyout. If it does not exist, you will have to create it.
How to Create the “ForceLegacyFlyout” Value
- In the Right Panel, Right-click on any empty space and from the Context Menu that appears, choose New
- Choose DWORD (32-bit) Value
- Name the new value ForceLegacyFlyout
- Right-click on the ForceLegacyFlyout value name you just created and choose Modify… in the Context Menu that opens
- To Enable the New OneDrive Fly-out, set the Value to 0 (zero)
- To Disable the New OneDrive Fly-out, set the Value to 1 (one)
The change should take effect immediately without any need to re-boot your computer. You’ll know as soon as you click the OneDrive Icon in the System Tray (aka, “Notification Area” in the new hoity-toity Windows 10 era). Microsoft can sure come up with some fancy-shmancy names, can’t they?
Now Me
Sharp-eyed, caring readers will have noticed in the first image at the top of this page that the current temperature in my area (at the time of writing this post) is -5 degrees Fahrenheit. This is an intolerable situation. I would like to ask of any generous souls to donate to my cause– that being a mere glimpse of happiness in the near future. I will limit donations to less than One Million Dollars (US) because I am not greedy.
Update – The predicted low for the morning of this publication is -16 F. Arrrrrgh!
Now You
I happen to like the new OneDrive fly-out better because it gives me a tad more information, but this all boils down to personal taste. Savor taking one more step in the direction towards regaining control of your computer.
As always, if you have any comments or suggestions, please share,
Richard
—
Never heard of a “fly-out”; Googling it sent me to buy airline tickets. I guess it’s a new Win 10 term but it would’ve been worth a sentence or 2 to define it.
Dan
Hi dan,
When writing geeky articles it is easy to forget that some of the jargon may be unfamiliar to some.
The term “fly-out” is not unique to Windows 10. A fly-out is basically any message or notification that flies out, or “slides” if you prefer, from a screen border, shows you a message, then disappears after a predetermined number of seconds.
In Windows 10, you can change which Apps and programs will show you these Notifications.
Go to: Settings–>System–>Notifications & actions
Hope this helps,
Richard