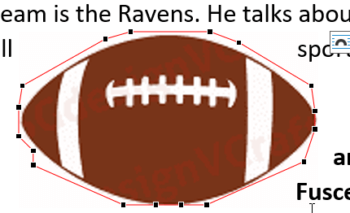
Wrap points create a path around an image which is called a wrap boundary. Microsoft Word will follow said boundary when wrapping text around your illustration. These wrap points are placed around your illustration automatically, based on your image type.
The really cool thing about wrap points is that you can move them around to create whichever boundary you would like around your illustration, even if it doesn’t have a transparent background. I can actually take an image that I have inserted that has a square wrap boundary, add additional points, and manipulate them to create a circular shape or any other shape for that matter. This gives you the freedom to have your text flow around your image in any way you would like!
Follow the steps below to learn how:
- Select your image.
- In the Arrange section, click Wrap Text which will then show you the menu.
- Near the bottom of the list, you will see the Edit Wrap Points option.
- Click on Edit Wrap Points to expose the wrap points around your image. Remember, they will be connected with red lines.
- To change the position of your wrap point, you must first select it, hold down your mouse button and drag it to where you would like it to be.
- While moving the wrap point, the red boundary line will be replaced by a black dashed line until you let go of your mouse button.
- It is also very helpful to be able to add additional wrap points so that you can manipulate your shape in any way you like.
- To add a wrap point bring your mouse to the place on the connecting red line where you want the point.
- Hold down your mouse and drag. The point will be added when you release your mouse.
- You can continue to add and move points until you get the shape you want. Should you want to delete a wrap point, you will need to move your mouse over it and press your CTRL key.
- A small x will appear over your wrap point. Click your left mouse button and your point will be deleted.
There will be more on this in later versions. Be on the lookout!
—


