Why join a group?
There are any number of reasons why you would want to. You could have a group of friends that love crochet or cricket, you could be a biker, a trapeze artist or you simply want to share things with others, without wanting to broadcast to the entire world.
From a personal point of view, I’ve been on Facebook since 2007 and like many people, my primary reason for jumping on the band wagon, was to keep in touch with my family and friends all over the globe, particularly since I don’t live in my home country. In this respect, Facebook is a major benefit and easily beats round-robin newsletters, which may never arrive at the intended destination anyway.
Clubs, hobbies and meet-ups are a good example of Facebook groups and I’ve joined a couple of biking groups, so that I can keep up to date with trips on the road or other events.
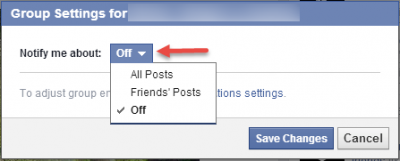
Once you join a group though, it’s a good idea to check your privacy settings, otherwise you’re going to receive notifications of almost every post by every member of the group, whether you want to or not. Over the years, Facebook has changed and it’s now become a little easier to tweak those pesky privacy settings too, so that when you start or join a group, it can be refined to your personal needs and requirements.
In the above picture, the settings appear to be a little vague, but receiving notifications on all posts to the group would seem sensible, or you wouldn’t know what’s going on in the group. You can change the setting any time you wish of course, particularly if some notifications become a pain in the neck.
Or, you can choose not to see individual posts or stop following a certain poster, like this:
Start you own group
One of the most popular reasons for starting your own group, is for keeping it in the family, so speak. You may have stories, pictures, family get-togethers and all manner of private information, that you see no earthly reason, should be shared outside the family. Conversely, is anyone outside your immediate family remotely interested in knowing about Aunt Betty’s 95th birthday party, when she managed to down half a bottle of sherry, whilst dancing the Charleston on your new dining room table?
It’s easy too and what’s more, it’s clearly free of charge! So head over to Facebook Groups and follow the easy, step by step guide.
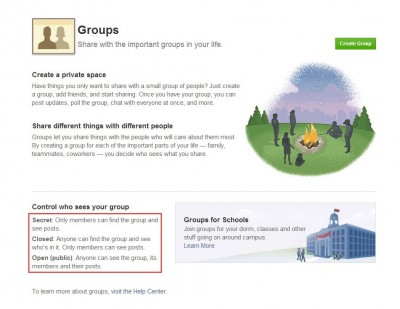
At this stage, it’s worth considering what type of group you want to create. Facebook gives you three options: Secret, Closed or Open.
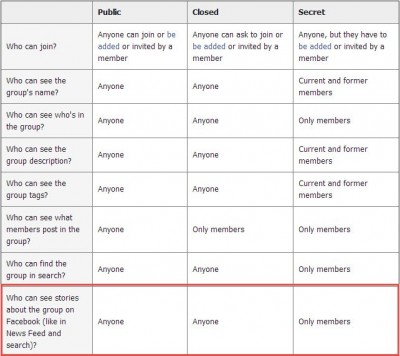
To help you understand what these mean, the following picture is definitely worth a look and will help you decide:
It’s worth noting that CLOSED is a little ambiguous and PUBLIC is exactly what is says. SECRET sounds terribly cloak and dagger and maybe a little elitist, but frankly, if you want to keep the circle truly closed, it’s probably the way to go. I mean, what’s the point of having a closed group, if posts and meeting arrangements are zapped out to anyone remotely connected to you on Facebook?
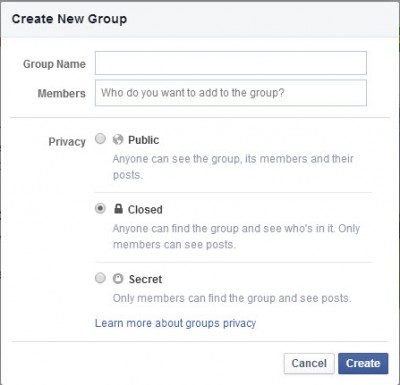
Set up the group
In this example, which is a close family group, we’ve made it SECRET for the reasons mentioned above and to tweak it a little further, we want to make sure that family members don’t start dragging every Tom, Dick and Harry into the group, or it’s going to defeat the object and not be very private at all.
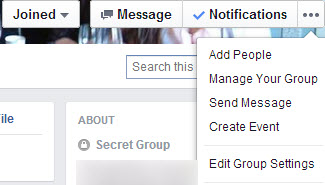 Facebook is very intuitive to use and by editing the group settings, you can ensure that you, as the administrator, take full control of privacy, at least to the extent that Facebook allows anyway, which is better than nothing.
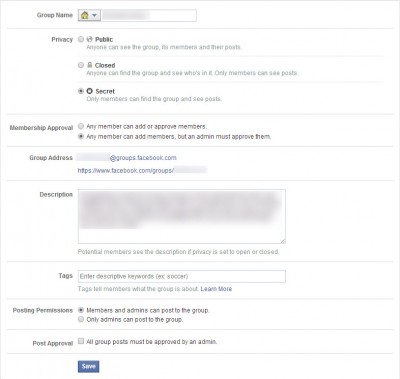 Having the administrator approve new members is very sensible and avoids any nasty misunderstandings, but I wouldn’t go as far as only allowing admins to post to the group, otherwise it’s going to get a little lonely in there.
Finally, take a little time in deciding whom to actually invite to the group as rescinding an invite could be messy and will surely complicate your Christmas card list. It’s important to let everyone know about the new group as soon as possible and this is usually very easy, using the INVITE or ADD button for your existing friends.
Be sure not to miss anyone either, especially if you’re still married to them or maybe hoping to be and you should find that GROUPS is a great way to stay in touch, whilst remaining under the radar and away from prying eyes.


