


One would think that it would be pretty straightforward wouldn’t one? I mean Microsoft has already by default set the left tab indents to 0.5 inches. Seems pretty simple, does it not? But, what if you sometimes require different tab spacing? Ah… there’s the rub. Heaven forbid, sometimes you may even require different tabs in different parts of your documents!
Tabs
So, let’s go over the lowly Tab from the beginning shall we?
Microsoft has deemed that tabs are a part of your paragraph formatting. I totally agree with that assessment. I think it makes sense to have that formatting together with your font, line spacing, justification, etc.
The first thing you will want to do is re-set your tabs. Follow the steps below to learn how:
- Click the Home tab of your Ribbon.
- In the Paragraph group, click the little symbol in the bottom-right corner.

- This will display the Paragraph dialog box.
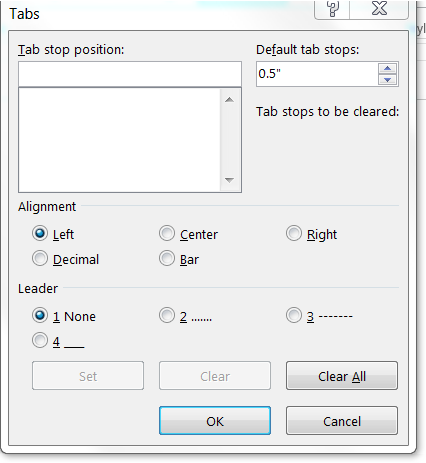
- Regardless of which tab of this dialog box you select, the Tabs function is only a click away. It is located in the lower left-hand corner of the dialog box. Just click it and the Tabs dialog will display.
This is where you learn how to make your tabs do what you want!
- Left tabs are the default in Word. As you can see in the screen capture above, under Alignment, Left is automatically selected.
- Just key in the tab position where you would like your tab to appear in your document (i.e., 3.0). Note that you can use inches, centimeters, etc., for this function.
- Now click the Set button and Ok.
But wait! There is always an easier method and I believe I may have covered this in an earlier post:
- If you love to save time and keystrokes as I do, you will love this. The only caveat is that you must have your Ruler visible to do this.
If, however, your Ribbon is not visible you can very easily make it visible by clicking on the View tab of your Ribbon and selecting Ruler from the Show group menu. - Now, click your mouse any place along the horizontal Ruler across the top of your document to set your tab.

- If you change your mind about the tab position, you can simply drag the one you already set to another destination.
- If you decide you want a different kind of tab entirely, simply double-click the setting you have already set to open the Tab dialog box and you can easily change it to right, center, etc.
- Click OK.
Bonus Tip
If you have ever tried to reset tabs for a document and then found that all your default tabs were gone, this is a real bonus for you:
- Select the text where you would like the specialized tabs.
- Set your tabs.
Now the rest of your document will remain unchanged!
Other Articles In This Series:
- How To Correctly, Quickly Use Tabs in Word – Part I ← You are here
- How To Correctly, Quickly Use Tabs in Word – Part II
- How To Correctly, Quickly Use Tabs in Word – Part III
- How To Correctly, Quickly Use Tabs in Word – Part IV
—


Thanks Carol. Useful information.
You’re very welcome Randy. Glad I could help!