
Word 2016 Style Gallery
Did you ever wonder if you could change what is shown in Word’s Style Gallery? How to add your own styles to it? Or rearrange the order in which your styles appear in the gallery?
Well, as it happens, changing what appears in your style gallery is actually easier than one might think. Once you have created your own styles, you can add them to the style gallery.
Learn How To…
Add Your Own Styles
Follow the steps below to learn how:
- Display the Home tab of your Ribbon
- Click the small icon at the lower right-hand corner of the Styles group to display the Styles task pane at the right side of your document
- In the style list in the task pane, locate the style you would like added to the Style Gallery
- Right-click the style name in the list. Word will display a Context menu
- Select Add to Quick Style Gallery
Very easy right? Your style should now be accessible through the style gallery. You could also, if you like, control your style’s presence in the style gallery.
Control Your Style’s Presence in the Gallery
Follow the steps below to learn how:
- Click the Home tab of your Ribbon
- Click the small icon at the lower right-hand corner of the Styles group to display the Styles task pane at the right side of the screen
- Scroll through the list of styles in the Styles task pane until you see the style you would like added to the style gallery
- Hover your cursor over the style’s name. A drop-down arrow should appear to the right of the style name
- Click the down arrow and select Modify to display the dialog box
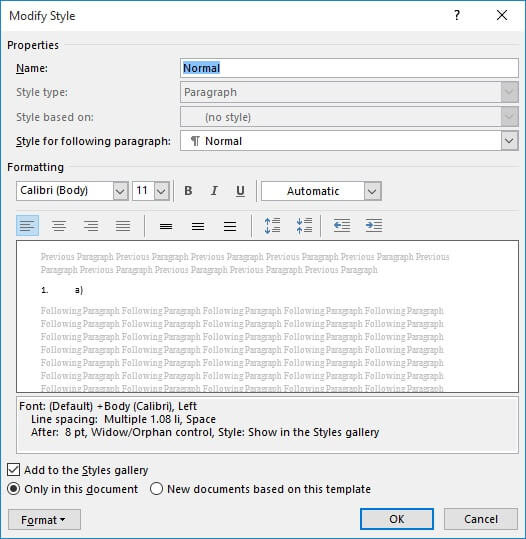
- Be sure Add to the Styles Gallery is selected
- Click OK to close the Modify Style dialog box
As you can see, you can remove a style from the gallery by simply deselecting the Add to the Styles Gallery check box (step 6). This is correct, but there is an easier way to do also! All you need do is right-click a style within your actual style gallery. From the resulting Context menu, select Remove from Style Gallery and the style will be immediately removed.
Ordering Styles
Ordering styles in the style gallery is a bit more convoluted, and Microsoft does not make the process very intuitive at all.
Follow the steps below to order the styles you previously added to your Style Gallery:
- Click the Home tab of your Ribbon
- Click the small icon at the bottom right-hand of the Styles group. Word will display the Styles task pane at the right side of the window
- Click Manage Styles at the bottom of the task pane to display the dialog box
- Make sure the Recommend tab is selected
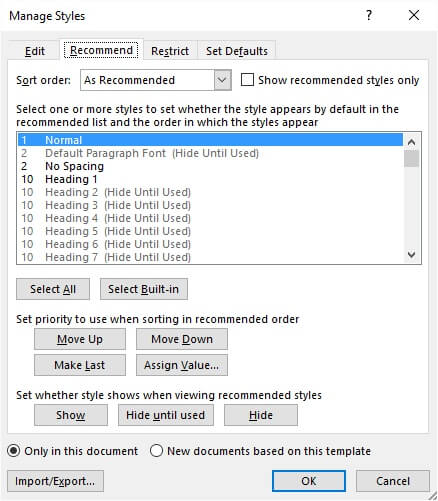
- In the list of styles, locate and click once on the style you would like to move around
- If a number (1 through 99) or the word last does not appear at the left side of the style, click Assign Value and provide a relative position (1 through 99) to your style
- Be certain Show Recommended Styles Only is selected
- Tweak the order of the styles in the gallery by selecting a style and moving it using Move Up, Move Down or Make Last. The numeric values of the styles are modified as to how you arrange them, and the numeric values control the order in which they will be displayed in your gallery
- When you are finished ordering your styles, click the OK button
Changes to what is in the Style Gallery or the ordering of styles in the gallery will be reflected in your gallery immediately.
—