
Coloring Up Outlook
Outlook for Windows Office and Microsoft 365 has been around for a long time and continues to provide users with updates to improve their email experience.
It is true that most users just want to open it and to be able to reliably read or write email but having the ability to reduce spam, organize and rename folders along with several other improvements is a plus for not only corporate, and school but for home users as well.
Using Colors And Fonts
One way to dress up your inbox is to make the incoming messages appear differently based on conditions you define like sender, topic, and even using keywords. It is easy to make your family appear in sky blue, bills appear green, and even combine fonts and colors so new unread mail will appear with larger text and still maintain the color attributes while the font will change after opening the email. The examples below are just to give you a feel for the possibilities.
How To Set Conditional Formatting
- In the Outlook top menu, click on View
- In the View tab, click on View Settings
- This will open a pop-up window; click on Conditional Formatting
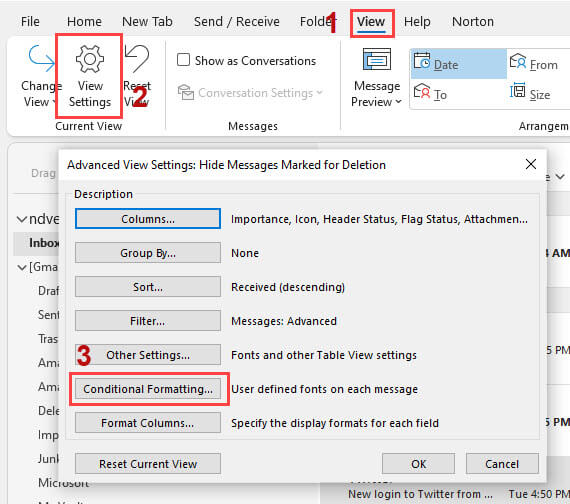
In this example, we are going to make all Unread email appear with Big, Black Bold Arial Rounded font.
- Make sure Unread messages are highlighted and appear in the selected rule below
- Click on Font which will open the Font Menu
- In the Font menu, pick the Font you wish to use
- Select the style
- Select the size
- Make sure you set the color
- Click OK
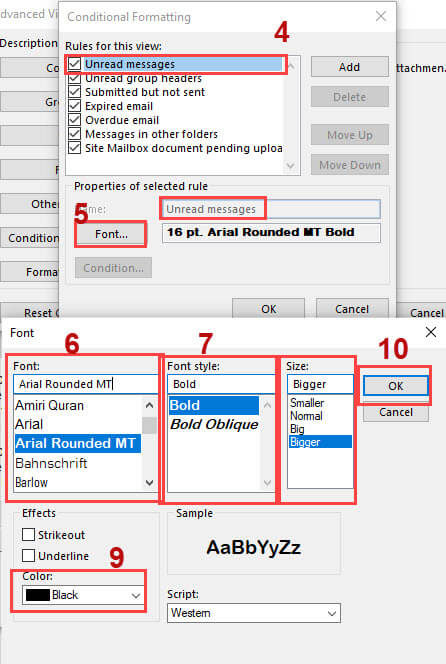
Once you click on OK, all Unread email will now appear in large bold and black text. You may add additional formatting conditions that will work without removing the first condition. In the first example, we set all unread email to appear in a bigger, bold new font. However, if you still want email from eBay to appear in “Purple”, you may do that as well.
Adding Additional Formatting
To add additional formatting or to add formatting to a new email category that is not listed, you need to use the “Add” button and create a new rule for Outlook to remember.
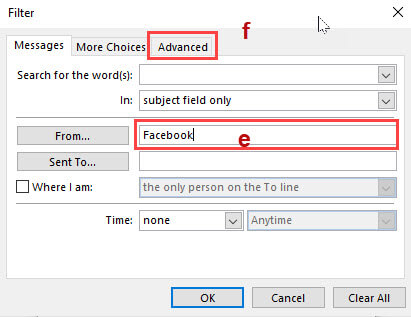
- Click on Add (this will open a new “untitled” rule
- Give the new rule a name in this sample “Facebook”
- Click on Font If we decide to maintain the same font for unread email just change the color in this case to “Green”. You are now finished. However, if you wish to add additional formatting, you will need to click on the Condition button
- Click on Condition

- Now we must change the “From” category. Enter the “From” information exactly as listed in the email — in this case “Facebook”. Note: Do not click on the “From Button”; just enter the name of the new rule in the area to the right
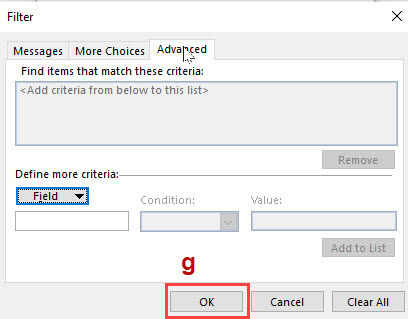
- Click on the Advanced tab

- Click on Ok

That’s it. Now, any new unread email from Facebook will appear in a bigger, bold Green font. As soon as you read the email, it will return to the original font, size, and color. If you wish to have any category remain in the chosen color, after it is read, just make sure to uncheck all the rules, then add the new rule. Now even after you read the Facebook email it will be in the regular font but remain green.
Conditional Formating – Add New Rules
In the image below, I used conditional formatting to make all my unread email Bold and Black and used a different font. Certain email will appear in color if I set that condition. An unread Facebook email will be Bold, Big, and Green. Once I have opened and read the email (see second FB email), it will still be green but in the normal font and font size.
You may create a rule to include multiple addresses. For instance, in the image above, I created a new rule by using the “Add” button, then named the rule “Tech Email”. After clicking on “Condition”, I entered all my tech-related email addresses in the “From” box separated by a comma. For example, in the “From box”, enter Daves Computer Tips, Toms Hardware, Bleeping Computer, PC Magazine, etc. Now all new email from those addresses will appear in large blue font and revert to the regular blue font after being read.
Color Your Contacts
If your contact list is getting long, you can easily change the color and organize your contacts by clicking on the people icon. An excellent tutorial can be found in the Outlook Help section by clicking on “Help” and then entering “Color code Contacts”. A list with images will appear giving you step-by-step instructions.
Summary
In the example above, I used both large and different fonts with bright colors to give you an idea of the possibilities. You may also set conditions using the same steps but instead of “From” you can use the advanced tab to enter “Keywords” that might be in the header, subject, or the body of the message. If you sent out 120 invitations to a Wedding, you could create a new rule, name it something like “Wedding” and then add “Keywords” like “wedding”, “groom” and “bride”, then set the font to a new color.
This is a great way to alert you to an email message from an unlisted “From” sender but contains the “Keyword” giving you a quick way to see all the invitation replies. Being able to organize your email and contacts by color can be more than just a fun trick, If you receive a lot of email, it can help you organize your messages in an almost unlimited number of ways.
—