

Upgrade GPU Drivers and Disable Dynamic Ticking.
This is an addendum to the original article on this subject – What Is DPC Latency, How To Fix It. For the full skinny on DPC Latency, you should really read that article before continuing with this one.
This will turn out to be an ongoing set of articles supporting the original. Each will offer one or more possible solutions for DPC latency problems.
Before making changes to your computer, it is strongly recommended that you make a full backup. That way, if things go south, you’ll have a way to get back home.
Read this Simple Guide To Creating & Restoring System Images – Part 1 to learn how.
Update Your GPU Drivers
Before I tell you where to get your drivers, let’s get one thing very clear. Proper installation of graphics drivers requires that you uninstall the old driver before installing the new one. Faulty graphics drivers can be the source for all sorts of hideous computer problems and it is important that you install a fresh copy. It must not be possibly corrupted by a previous installation. Heed this advice.
AMD
You can get the latest and greatest AMD drivers for your graphics cards and chips at this AMD Support page. Scroll down the page a bit and you will see this:

Pick the items that match your hardware. When you’re done, click the Submit button.
Nvidia
You can get the latest and greatest Nvidia drivers for your graphics cards and chips at this Nvidia Support page. Scroll down the page a bit and you will see this:

Pick the items that match your hardware. When you’re done, click the Start Search button.
More on AMD
I don’t think I’ve ever owned an Nvidia card so I won’t be of much help there. AMD’s download will be a healthy EXE file. I usually run it as an administrator. I also choose a temporary folder to store the considerable number of files it generates. That way, I can delete them afterward and not have them taking up space on my system drive. They are not needed after the drivers are updated and so become dead weight.
In fact, you don’t need that huge file you downloaded, either.
Disable Dynamic Ticking, HPET, Platform Clock
Note: These instructions apply to and have been tested on Windows 10. I believe they can be used on Windows 8.1 and newer but I have no way to test that.
Dynamic Ticking is another power-saving feature. These features can sometimes cause hiccups when you are running your computer.
HPET is a timer the computer uses. If it is enabled, then most likely Windows is using it, too. That’s where Platform Clock comes in.
Command Prompt
The most straightforward way to open an Administrative Command Prompt is to do this:
- Open the Windows Start Menu
- Type cmd
- In the right-hand panel, choose Run as administrator
Dynamic Ticking
Open an Administrative Command Prompt.
To disable Dynamic Ticking, run the command bcdedit /set disabledynamictick yes
To enable Dynamic Ticking, run the command bcdedit /set disabledynamictick no
Reboot your computer to apply the changes.
Platform Clock
Open an Administrative Command Prompt.
To enable the Platform Clock, run the command bcdedit /set useplatformclock true
To disable the Platform Clock, run the command bcdedit /deletevalue useplatformclock
Reboot your computer to apply the changes.
HPET (High Precision Event Timer)
The HPET timer setting will be located in your BIOS/UEFI. Every motherboard is different and the settings are all over the place. Once you find it, disable it. It is now time to break out your computer user manual so you know where to look for it.
Note: I read somewhere that the HPET setting no longer exists on Asus motherboards. Maybe that’s true and I do know I can’t find it on my Asus TUF Gaming X570 board.
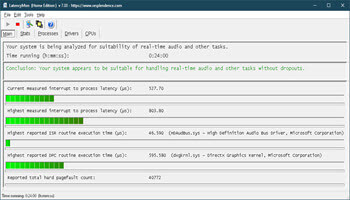
Testing The Results
The simplest form of testing is to start using your computer as you normally would. Also, you can run LatencyMon again to see if the results have improved. LatencyMon was discussed in full in the What Is DPC Latency, How To Fix It article.
If the lagging/stuttering problem has gone away, then you’re done. If not, then there are more things you can try and we will be discussing those options in future articles. Stay tuned…
As always, if you have any helpful suggestions, comments or questions, please share them with us,
Richard
—

