
I make a lot of appointments on my calendar and I realized soon enough that color coding them makes them easier to identify at a glance. In Outlook, this is done quickly using categories and you can even do it automatically.
Assigning a Category to an Appointment
- Create an appointment by typing it directly on your calendar, open that appointment up by double-clicking on it to show the full appointment menu. Click on the Category drop-down box arrow.

- Choose from an already created category or create a new one to assign it to your appointment. Click Save & Close. (NOTE: You can apply more than one category to an appointment, but this is not easily viewable on your calendar.)

Create a new Category
- To create a new category while creating your event, go to the bottom of the Categories drop-drown box and click All Categories > New… > New
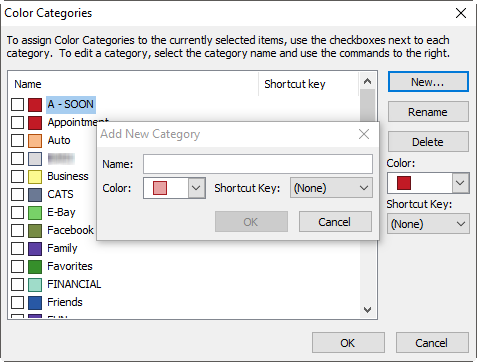
- In the Add New Category window name your category, select a color and click OK > OK
Automatically Assign Color Coding to your Appointments
I use automatic color coding for repetitive appointments like doctor visits, birthdays, vacation days, staff meetings, manager meetings, etc. Many times I am applying the Appointment category I already have, which is using a dark red color to catch my attention, but other times I create categories specifically for an appointment like birthdays.
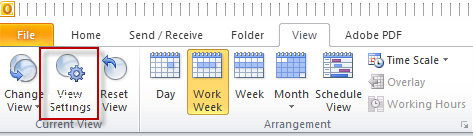
- Under the View tab click View Settings > Conditional Formatting
- In the Conditional Formatting window click Add
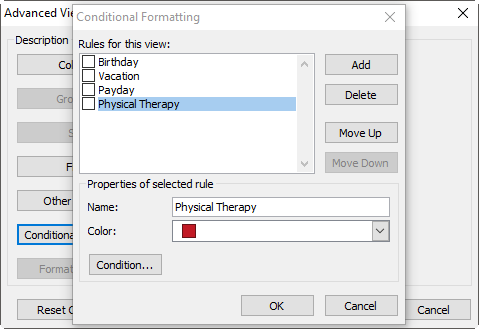
- Type the name of the appointment you would like to get color categorized automatically in the Name box, choose the color in the Color drop-down box, (you can use a color that is already attached to a category that you want to use or you can select a new one) and click Condition…
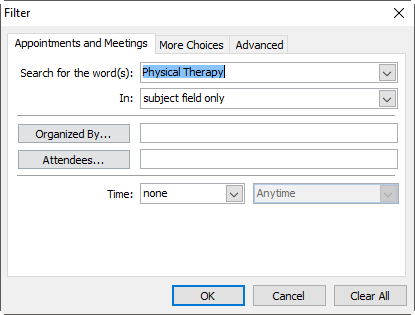
- In the Filter window type the word or words you will use consistently when creating the same appointment in the Search for the word(s): box. (Make sure you type this correctly and only include words you will use every time.) Click OK > OK > OK.
- Create a new event on your calendar using the words you just used to create your conditional formatting filter. The category and color should be automatically assigned to your current appointment and all other appointments that fit that filter.
NOTE: I’ve noticed that if I try to edit the automatic filter, it doesn’t seem to want to work so I usually delete it and start over if I want to make changes.
—