


More Articles in this series:
- Part 1: Resource Monitor
- Part 2: Even Viewer

If you are connected to the internet, having a firewall is a must. Without it, any hacker may waltz right into your operating system and create havoc at will. Not having a firewall is like leaving your car doors unlocked and the key in the ignition.
The Windows Firewall has come a long way since it was released with Windows XP. Since XP service pack 2 it is set “on” by default. The basic mode does protect you and in most cases, it is all you need to prevent unauthorized access. However, you are not really utilizing all the power of your Windows Firewall unless you modify its basic settings and that is where our next tool comes into play. In the following text, app and program mean the same thing.
Windows Firewall with Advanced Security
If you wish to set any of the security functions of your Windows Firewall on any computer running Windows, the Windows Firewall with Advanced Security Tool in the Administrative Tools package is the place to go.
Understanding Firewalls
First of all, some of you might want a better understanding of what a Firewall is. There are two common types of firewalls, software and hardware. In many cases it is just a software program but in the best case it is a combination of both a software and hardware firewall (i.e. a router) one that exists between your computer and the Internet. Windows Firewall inspects all incoming packets for all IP traffic both (IPv4 and IPv6). The default setting is that all incoming traffic is blocked automatically unless it is a direct response to a request made from your computer or unless is has been set specifically by a rule.
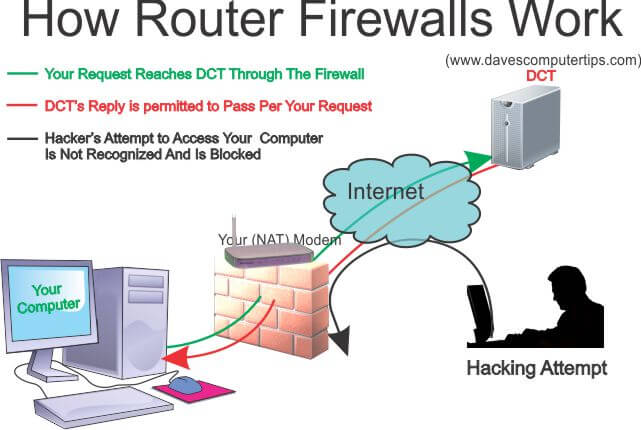
Both types of firewalls help screen out hackers, and worms that try to reach your computer from the internet. It is hard to stress how important it is to have a good (NAT) “Network Address Translation” router installed as your first line of defense against internet intrusion. It is also important to have a software firewall for internet intrusion as well as a defense against local network intrusion. For example, if a family member becomes infected while surfing in a local coffee shop and then connects that infected computer to your network either wirelessly or with a cable, a “router based firewall cannot” prevent the spread of the local connection to your computer. A software based firewall running on each computer will. This post will only be discussing the software version that is installed in every release of Windows since XP. (Most of this information will work with Windows XP but remember that if you are using Windows XP, Microsoft support ended in 2014.)
If a worm did happen to sneak by your hardware firewall or as mentioned above, an infected system is attached to your network, having the software firewall functioning properly is the next best line of defense.
That is where the “Windows Firewall with Advanced Security” tool comes into play. Because the primary role of the firewall is to prevent unauthorized access while at the same time permitting authorized access to and from your computer Microsoft automatically sets the rules and exceptions for all inbound traffic to “block”.
But why stop there? To increase your personal security this tool gives you the ability to tweak the settings to fit almost any security situation you wish. (Note: Windows Firewall cannot block Email viruses or Phishing scams. Firewalls can’t determine the contents of email messages so therefore cannot protect you.)
You may never need to adjust the security settings of your firewall but there are times that a program might require an exception to be set or you may wish to set up a rule that will block access. This post will walk you through setting rules and exceptions so if the need arises, you will be able to handle it like a pro. And don’t worry, if at any time you believe you have made an incorrect setting, or become lost you may reset the Firewall to its default setting.
Accessing The Tool
The first thing you need to do is open the tool. From your Control Panel, select Administrative Tools, then select Windows Firewall with Advanced Security. You may also select Windows Firewall then select Advanced Settings.

The screen below will appear. It is divided into three columns, from left to right, Navigation, Information and Action.
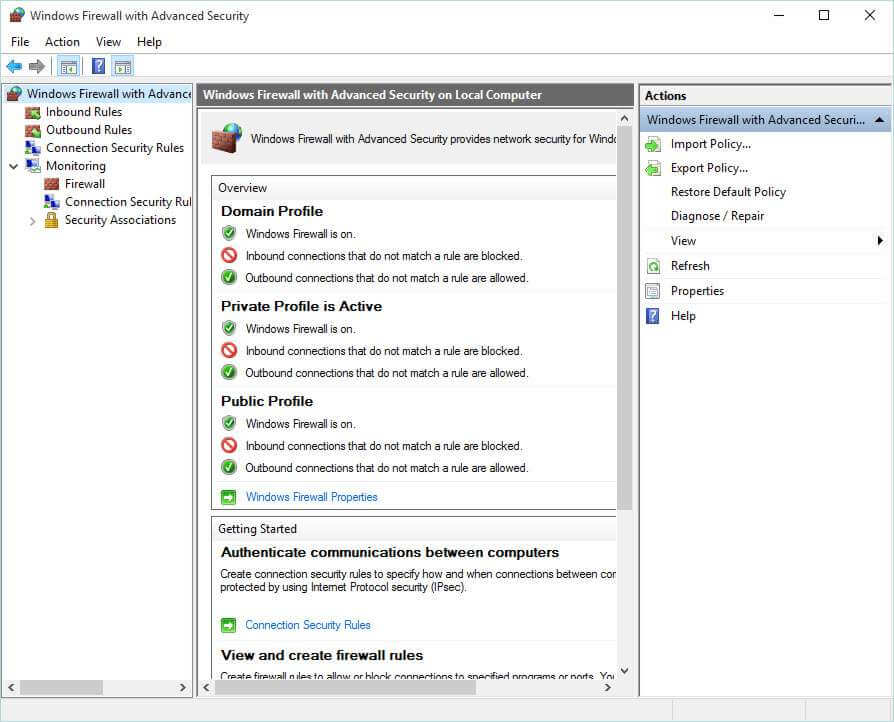
The navigation column allows you to choose between Inbound and Outbound Rules, Connection Security Rules, Monitoring of the Firewall and finally Security Associations. The Information column changes with each selection made in the left column. The Actions available in the right column will change based on selections you make. I will define most of the settings and explain how you might use them in practical situations.
When you first open the screen, the center column (Windows Firewall with Advanced Security on Local Computer) provides you with an “Overview” of your current settings for the Domain, Private and Public profiles. Clicking on Windows Firewall properties will give you a more in depth view of each profile as well as your IPsec Settings.
The second section “Getting Started” provides links to help you get started in setting rules and provide an even more detailed view of your profiles. You will find that there are a lot of ways to navigate to each section. Your computer has a factory preset default for each profile so my goal right now is to explain what each of the profiles mean.
Profiles
Windows recommends activating all profiles and letting the Network Awareness API functionality installed in Windows choose which is used.
Domain Profile: This applies to a network adapter (business computers that are connected to a network domain) when it is connected to a network on which it can detect a domain controller of the domain to which the computer is joined. It is not used for personal computers. When a computer is successfully logged into a domain the computer automatically uses the Domain Profile, You do not get to choose.
Private Profile: a network that is not connected directly to the internet but is behind some kind of security device like a NAT (Network Address Translation) router or other hardware firewall. This is the most common setting for home users.
Public Profile: Primarily used when the computer is connected to a public network like a coffee shop, hotel or hospital, etc. If you are sitting in your local coffee shop a program that normally accepts inbound connections from the internet may not work in this profile because the default setting will block all inbound connections that are not on the list of allowed programs.
Unless otherwise specified, I will be covering Private Domains in this post but the rules and exceptions may be applied on any or all profiles.
Traffic Types
The Windows Firewall with Advanced Security allows you to set rules for three types of traffic.
Outbound: This applies to data you send from your computer to another place on a network or to the Internet. When you visited the Dave’s Computer Tips website today, you sent data requesting access and you sent data to open this post. Your requests are filtered by Outbound Rules.
Inbound: This applies to data you receive from a network or over the Internet. Once your request to DCT was made, data begins arriving from the internet and is accepted by your computer through the rules that are set in the Inbound Rules. Another example: I use a program called “Filezilla” which is a FTP (File Transfer Protocol) program. I use it to download files from a server. That download is governed by the Inbound Rules.
Connection Security Rules: This feature uses IPsec (Internet Protocol Security) to secure data while it crosses the network. It is used for communication between two specific computers. This set of rules is very different from the Outbound and Inbound rules in that both computers must have the same rules set for the connection to work. Users may set security options like key exchange, authentication and data encryption.
In addition, all of the rules may be set so they are specific to certain computers, user accounts, apps, services, etc. You may configure the rule to be applied when any profile is being used or only when a specified profile is being used.
To start in this example, click on Inbound Rules in the left column. This will change the view in the center window to show the list of all Inbound Rules that have been set by the Windows OS and also any rules set by the user. Important Note: changing your firewall configuration affects your security. It is recommended that you record any changes you make so you may remove them if you wish.

The rules for all traffic may be in one of two states enabled or disabled. Also rule types for I/O and Connection Security Rules are indicated by a symbol in front of the rule.
- Green Check Mark (enabled)= Allow the connection
Red Circle with a line (enabled)= Block the connection or it must meet IPsec settings. - No indicator = This Rule is disabled
- Icon of two computers (only on Connection Security Rules) = Allow or restrict a connection between two computers through the use of Internet protocol security (IPsec)
Understanding and Using Rules
Windows Firewall presets certain rules. For example service restriction. The firewall will allow a service to communicate only on the ports it says it needs and will block anything else. You would have to create or modify a rule to change this preset process. When you install a program into your OS, it will communicate with Windows and set new rules for your firewall that it will need for communicating.
To understand how a rule works, I will be working through both an Inbound and Outbound connection. Note: While there are reasons for setting some outbound rules, the fact is that the programs or you, the user, are controlling them. As a matter of fact all outbound rules are set as “On” by default. You would have to set a specific rule to change that. For example, if you had other users on your PC, and you wanted to prevent them from signing on to a certain site or program, you may create a rule in the Group Policy to block any connections to the login servers for that particular user or even for all users but you.
Setting Rules
To start,
- Double click on Inbound Rules in the left column. (see figure 3 above). It will change the center column to look similar to (fig 4).
- Click on New Rule in the right column (fig 3) and it will open the “Inbound Rules Wizard” Screen. (fig 5).
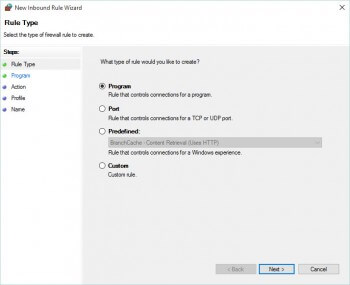
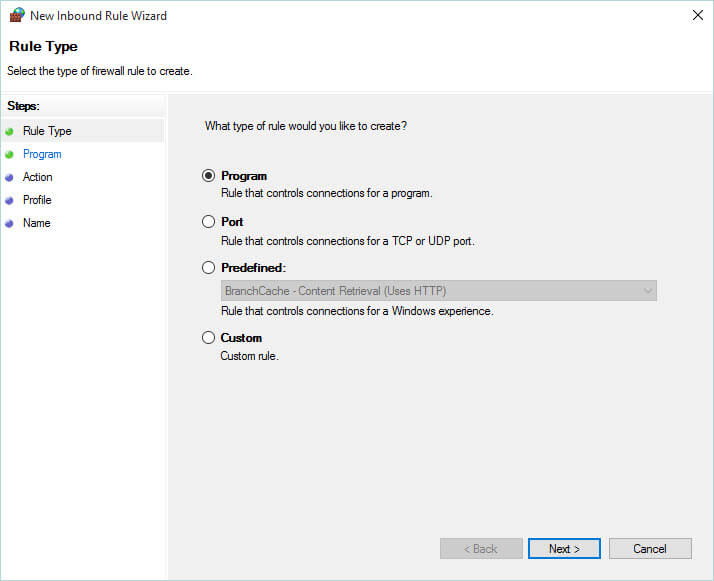
Figure 5 Inbound Rules Wizard Showing Rule Types The Wizard tool will default to “Program” but you have a choice of which type of rule you would like to create? We will only be working with Program type in this tutorial but you do have the option of creating a rule that would apply to Ports, either specific ports or all of them. Additionally, advanced users may create custom and/or Predefined rules not covered in this tutorial. If you notice, the left column in the Wizard will show you the steps you will have to take. The steps will change depending on the of rule you select. i.e. Program, Port, etc. For Program the steps are:
- Rule Type
- Program
- Action
- Profile
- Name
- In the Rule Type screen Select Program if it is not already selected and then click Next.
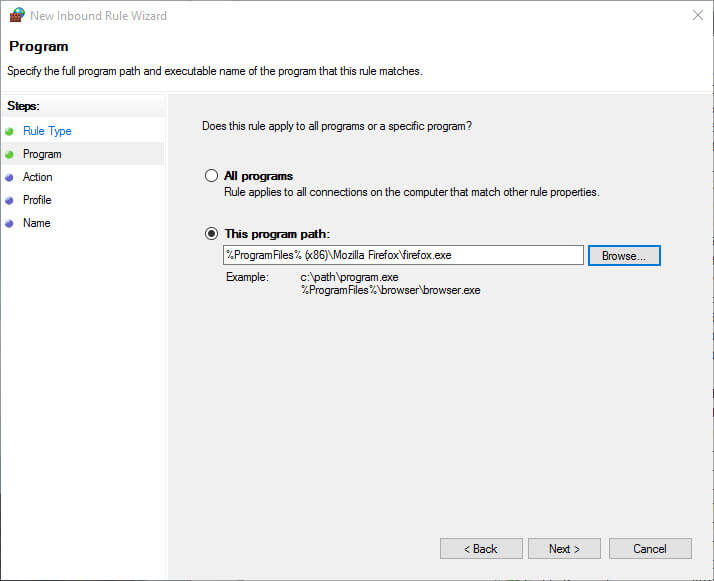
- W may choose All Programs, or a Specific Program. For this project, we are going to select a specific Program for this rule. Select “This program path” and browse to wherever you have Firefox located on your drive, if it is not installed on your machine you may use the same method to select Chrome or Internet Explorer. Fig 5a It does not matter because we are going to delete this rule when we are finished with this tutorial. We are only doing this to show you how it is done.
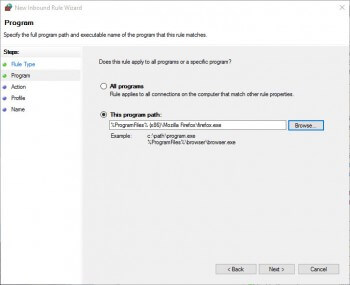
Figure 5a Program Path with Firefox Selected - Click on Next. to open the Action screen. (fig 5b). This screen allows you to select the action to be taken when a connection matches the specified conditions. Choose “Block the Connection”
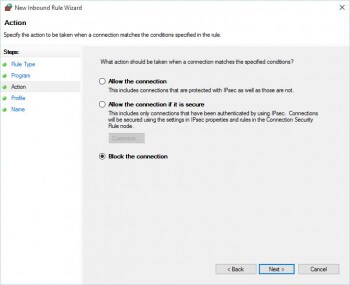
Figure 5b Action Screen – Block the Connection - Click on Next to open the Profile screen. (Fig 5c) Note: You may choose any combination but Windows recommends that all profiles should be enabled. The correct one will be applied based on the Network Awareness API functionality. Ensure that all are selected.
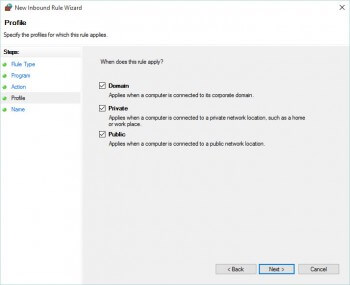
Figure 5c Profile Screen - Click on Next to open the Name screen. (Fig 5d) If you plan on managing rules, it is important to name the rule with a concise but informative name. You may enter a brief description to help you understand why you made the rule but it is optional. Name your rule ” Block Firefox Rule” and click on Finish.
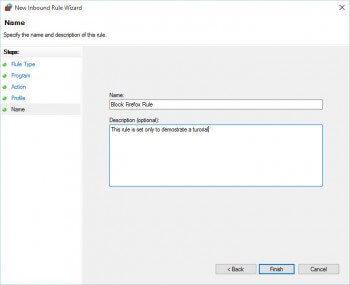
Figure 5d Name Screen


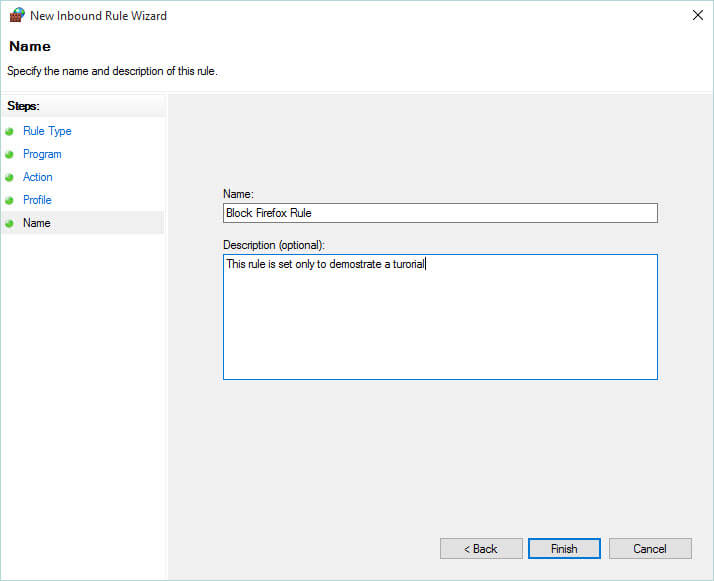
After you click on finish you should see the new rule in the center column with a red circle and a slash. (Fig 6) This indicates that the action for this rule is to block Inbound traffic from Firefox. If you repeat the 7 steps above for Outbound Rules, you will then be able to check your results by trying to run Firefox. It will not be able to access the internet.

If you did follow the steps above, please click on the new rule and select Delete from the right column.
Connection Security Rules
Another feature of the Windows Firewall With Advanced Security is the ability to set connection security rules. These are very different than the I/O rules in that they do not apply to programs, ports and websites, etc. They are specifically for the secure connection between two computers or endpoints.
Setting Connection Security Rules
The instructions below are very similar to the 7 steps above so I will not supply the screen shots for each step.
To start:**
- Double click on Connection Security Rules in the left column. (see figure 3 above). The center column will probably not contain any information because no security rules are set.
- Click on New Rule in the right column (fig 3) and it will open the “New Connection Security Rules Wizard” Screen. The Wizard tool will ask which type of rule you would like to create? If you notice, the left column in the Wizard shows you the names of the steps we will be performing they are slightly different than the steps for I/O rules.
- Rule Type – These include:
- Isolation – You may restrict connections based on authentication criteria like credentials, etc..
- Authentication Exemption – You may exempt certain computers from the rules by using IP address or predefined groups.
- Server-to-server. You may create a secured connection between all devices in Endpoint 1 and Endpoint 2 by using IP addresses.
- Tunnel – You may create a secure connection between gateway computers like connecting across the Internet between two security gateways.
- Custom – You may create a custom rule that can’t be set by the types above. (for advanced users)
- Requirements
- Authentication Method
- Profile
- Name
- Rule Type – These include:
- Select Requirements and then click Next.
- In the Requirements screen, we may choose one of three options, select Request authentication for I/O connections
- Click on Next. to open the Authentication Method screen. Select Default
- Click on Next to open the Profile screen. Note: You may choose any combination but Windows recommends that all profiles should be enabled. The correct one will be applied based on the Network Awareness API functionality. Ensure that all are selected.
- Click on Next to open the Name screen. Name your rule ” Test CSR Rule” and click on Finish. You will now see your new rule listed in the center column. Please do not forget to delete this rule after this tutorial.
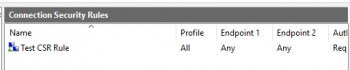
New Rule Displayed

**Note: The rule created in this tutorial will work in conjunction with the IPsec settings. You may leave them to their default setting (if you are not an advanced user I would recommend that you leave them at default). If you wish, you may modify them to meet your requirements. To modify IPsec Settings, right click on Windows Firewall with Advanced Security in the left column and select Properties, Select the IPsec Settings tab. From here you may customize or by going to the advance setting, set integrity algorithms.
Summary
I understand that modifying the Windows Firewall is not for everyone but it is not difficult and if you are having a connection problem, having the knowledge of how to add, delete or modify rules for programs and ports might just be the ticket. Hopefully, this post will familiarize you with the process and increase your overall security for your computer.
It is important to remember that a firewall is not the same thing as an antivirus or antimalware program. The firewall only protects you against internet worms and hackers where the other programs protect you against malware. It should be used with these types of programs not instead of. You should not turn your Windows Firewall off unless you have a *third party firewall in place. I personally think that the total integration of Windows Firewall into the OS is so smooth and efficient that it is your best choice for firewalls.
Keep tuned in for the final two installments of Administrative Tools.
Jim

