The new superbar (taskbar) in Windows 7 is truly a joy to work with. Having the ability to pin programs to the taskbar and change their order is a big convenience compared to older versions of Windows. In fact, before Windows 7 I was in the habit of opening my email client followed by my browser before I opened up any other program. Why? So I could have their icons in the same location every time. I know that may seen a little extreme, but having the icons in the same location actually allows me to be more productive, especially when switching between 4 or 5 programs.
Due to these new features in Windows 7 Microsoft did not include a Quick Launch toolbar with Windows 7. I understand their decision, but creating a Quick Launch might be useful for some. I use it for my Recycle Bin (more on that later), but the uses are endless for anyone wanting a little more control over the taskbar and computer.
If we look at the taskbar in Windows 7 there is quite a bit of unused space for us to work with. Let’s put that to use by adding a Quick Launch toolbar with the Recycle Bin, and while we’re at it we will remove the Recycle Bin from the desktop for a cleaner appearance.
![]()
Adding the Quick Launch toolbar to Windows 7
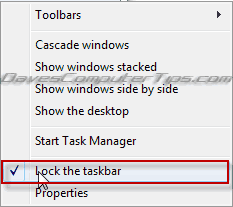
- Right click a blank area on the taskbar and click on Lock the taskbar to remove the checkmark.
- Right click a blank area on the taskbar. Move your mouse to Toolbars to open the toolbars menu. Move your mouse over to the new menu and click New Toolbar.
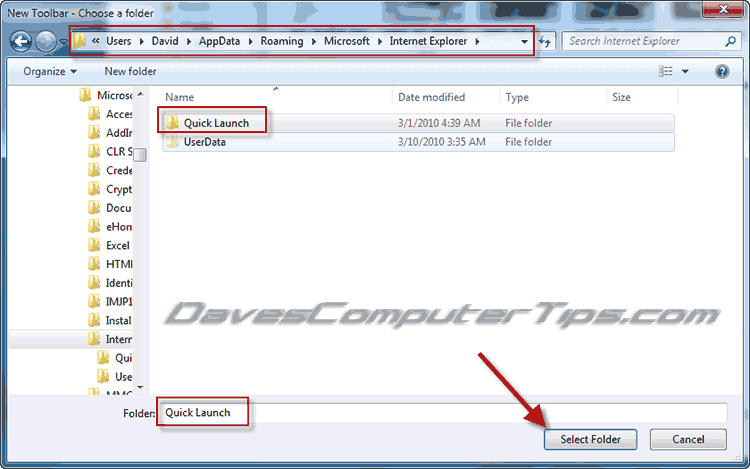
- A window will open directing you to select a folder. Navigate to C:\Users\YourUserName\AppData\Roaming\Microsoft\Internet Explorer and highlight the Quick Launch folder. Quick Launch should appear in the dialog box next to “Folder:”. Click Select Folder.
- Right click in the new Quick Launch area. In the menu that opens click Show Title to remove the checkmark. This removes the Quick Launch label from the taskbar.
- In step #4 we removed the Quick Launch label. Now we will repeat the same steps, but choose Show Text to remove the icon text. Right click the Quick Launch toolbar. In the menu that opens click Show Text to remove the checkmark. You can see the results below.
- Right click on the Quick Launch toolbar and move your mouse over View at the top of the menu. In the menu that opens select Large Icons.
- Drag any item you want to the Quick Launch toolbar. It will be functional – The Recycle Bin works as normal, My Computer works as expected, folders allow drag and drop, etc.
- Once you are finished customizing the Quick Launch toolbar place your mouse over the raised area to the left of the icons and drag it to the right to remove the extra blank area in the Quick Launch toolbar. If you drag it too far you will see the far right icon disappear and a double arrow appear, though if you add several icons you may prefer this.
- Once you have everything as you want right click an empty area of the taskbar and select Lock the taskbar to see the finished product.


Once you’ve clicked Select Folder you will now see the Quick Launch toolbar on the right side of the taskbar. Mine is blank, but if you’ve installed legacy programs there may be a few icons showing. If you do not want them right click the unwanted icon and select Delete.
Great. Now what? Well, I don’t particularly like the “Quick Launch” text showing. I also want anything I add to match the rest of the taskbar!
I know you’re thinking this Quick Launch idea is groundbreaking, but in the back of your mind you are wondering what use it may be to you. My favorite use is to move the Recycle Bin to the Quick Launch bar so it is useable even when your desktop is hidden by full screen programs, but you can drag almost any folder, icon, or shortcut to the Quick Launch toolbar making it a useful way to organize data and personalize Windows.
Above I’ve added the Recycle Bin and a folder from my desktop by dragging them to the Quick Launch toolbar. Nice to have them there, but I want them to match the remainder of my taskbar.
Great. No text, but the icons are a little small compared to the rest of the taskbar.
You can see that things now look much better and still maintain the Windows 7 “feel”.
There ya have it!


