

When programs are installed, they configure themselves to startup associated files like drivers, services and DLLs, (Dynamic Link Library) items automatically. These processes might check for updates to the program, display an icon in your system tray, etc. They do this without your permission but in many cases it is something you want anyway. However, some of these associated files (called images) can use valuable resources that you need for other functionality. Autoruns is capable of displaying each and every one of these images, giving you the option of disabling or even deleting them.
A few months back, I wrote a post about optimizing computers and it included some tips on using Autoruns. Now I think it is time to show you some of its best features and show you how easy it is to learn. I will walk you through what I feel are a “Bakers Dozen” of the best features for using Autoruns.
ONE
Free: It is Free. That’s right, not a penny out of pocket for perhaps the best product of its kind. It is also easy to obtain.
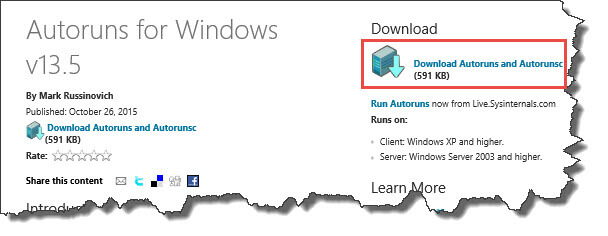
- Using your browser, navigate to the Microsoft Sysinternal web page. You may click on this link to get there.
- Download the program. The download will be a .zip file that contains the GUI file as well as a command line program that will allow you run a DOS version. We will be working with only the GUI version. Extract the file to your hard drive.
- Navigate to the correct file “Autoruns.exe” Not “autorunsc.exe”, right click on the program and select “Run as Administrator” You will not be

TWO
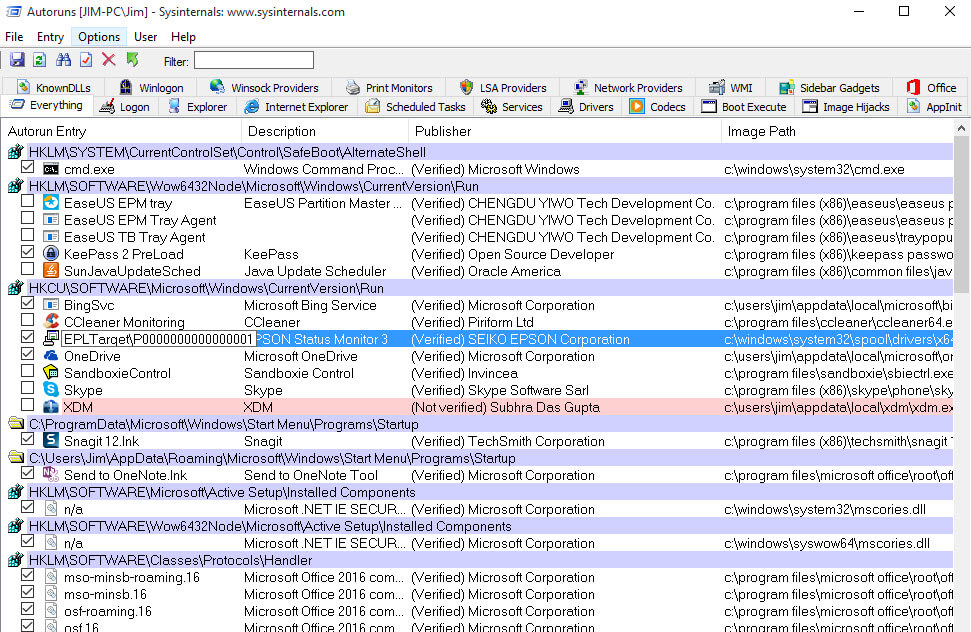
Scans All Known Locations: Autoruns is capable of scanning your system of all known startup locations. There are over 100 different locations where files may start. Programs start from your login, from the registry, when you open Explorer, or start Services or Drivers and more. Every item displayed, also called an “Image” can be viewed using the filter options in the program.
Your operating system has many locations where drivers, services, apps and programs may start. Most programs that list startup programs do so using the general startup area of Windows. For example, programs like Msconfig, CCleaner and the Startup tab in Task manager do not even come close to displaying all the startup images. Autoruns does. Knowing every image that starts can help you locate any malicious items.
THREE
List Images In The Order They Start: When Autoruns starts, it starts in the view “Everything” tab and actually lists the items in the exact order that they start.
When you start your computer, you might notice there is a long pause before you hear the familiar Windows startup music. You might even have to wait longer to have full control of your system. 
FOUR
Tabbed Viewing: Autoruns, breaks down the startup of items into 20 different tabs for easier viewing.
Looking at my Autoruns screen I can see that there are well over a hundred items capable of auto starting on my system. That is a lot of items to view on the “Everything” tab. Autoruns provides tabbed viewing to make viewing them much easier. I may isolate my view by Services, Drivers, Logon, etc.
- Logon: Displays standard autostart locations
- Explorer: Displays Explorer shell extensions, browser helper object, toolbars and others
- Internet Explorer: Displays Browser Helper Objects, IE toolbars and extensions
- Services: Displays all windows services configured to start at bootup
- Drivers: Displays all non disabled registered kernel0mode drivers
- Scheduled Tasks: Displays all tasks configured to start on bootup
- AppInit DLLs: displays DLLs registered as initializations DLLs
- Boot Execute: Displays non Windows images that run before the boot process of the OS
- Image Hijacks: Displays Image file execution options and command prompt autostarts
- Known DLLs: Displays the locations of DLLs loaded by programs
- Winsock Providers: Displays registered Winsock protocols
- LSA Providers: Displays Local Security Authority and security packages
- Printer Monitor Drivers: Displays DLLs that into the printer spooling service.
- Sidebar: Displays Windows Sidebar gadgets.
FIVE
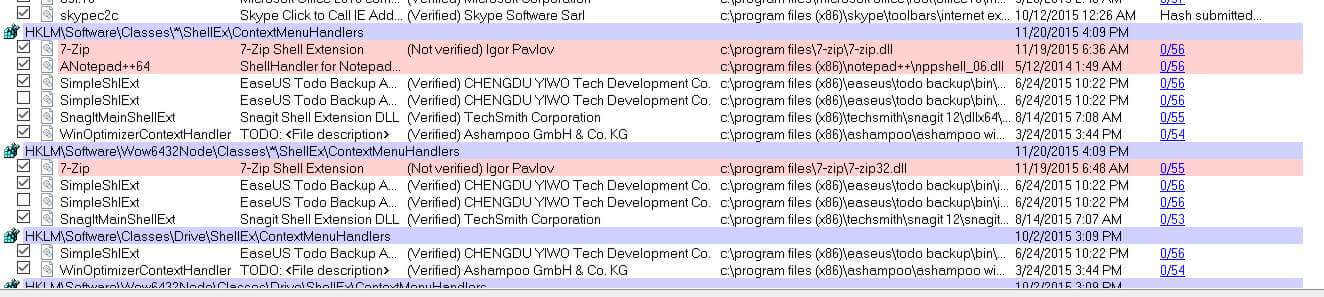
Color Coding: Each item is shown in an easy to understand identifying color code depending on the state of the image.
- Light Blue is reserved for the location of the startup and is not an actual task but an indicator of where the tasks under the blue line reside.
- Pink is reserved for non-verified items. This will give you a fast way to locate items on your system that have not been digitally signed. This of course does not mean they are malicious but that they should be viewed with suspicion until you know they are not.
- Dark Blue indicates that the item has been selected by the user and has no other meaning.
- Yellow is reserved for items that cannot be located by Autoruns. Note: In Windows 8.0 and later, many of the Known DLLs and some services will always be displayed in yellow, that is just a bug in the way they are displayed. If you are not having any issues with these files I recommend that you leave them checked. Windows will probably stop you from changing any that are vital to the system, even if you are logged in as an administrator.
SIX
Digital Verification: Autoruns lists every file as “Verified” or “Not Verified” giving you insight on which programs might be a problem.
As mentioned above, when an entry is shown in pink, it means that its digital signature is nonexistent which can happen a lot with third party software. Sometimes the verification is no longer valid or has not been updated by the person or company that produces the software. While not being verified is not good, it is not always bad. It could be a result of sloppy programing or some small programs that do not want to pay the cost of verification. If you are experiencing a problem, I would disable it from startup and see if your computer performs better.
SEVEN
Filter Options: You may filter how the items are displayed in several ways that will make viewing and understanding the items easier to understand.
- Filter options for Autoruns include 5 filters. Using them in different combinations may help you achieve the exact view for your needs. For example: clicking on Include empty locations, and ensuring that Hide Microsoft and Windows entries is unchecked will show you every file location on your system.
- Include empty locations – Unless this is checked Autoruns will not show locations with no entries.
- Show only per-user locations – Select a User from the users menu and auto starting images will show for that account.
- Verify Code Signatures – Autoruns will query the CRL web sites to determine if an image signatures exists and only show images that are not signed or not signed by Microsoft.
- Hide Microsoft Entries – Hides all Microsoft entries including the OS and Office,
- Hide Windows Entries – Hides all Windows images. You may choose any combinations but viewing all Windows entries will display a lot of images.
EIGHT
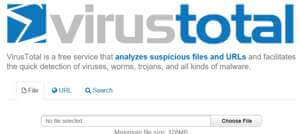
Virus Total: Works in tandem with the “Virus Total” website.
Virus Total is a website that allows you submit any process for scanning. It will run that process through more than 50 different scanners. They will check for viruses and malware. You may right click on any item and check its virus total score or you may select “Entry” in the toolbar and then select Resubmit Virus Totals to obtain the Virus Total for every image. The scanned images will appear with a score under the Virus Total column. Most images should show a zero in front of the backslash. Some however might show a 1 or 2 this probably means it is not recognized by a particular scanner. If it has more than 1 or 2 I would not leave that image on my system until I thoroughly investigated the reason. In the image below you can see in the far right the actual Virus Totals for the images. If you notice, the first one states “Hash Submitted” Depending on your connection speed, it may take a while for all images to load.
NINE
Online Search: Autoruns give you the ability to search for any online information for any image.
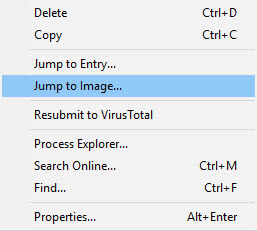
Right clicking on any image will bring up a menu giving you the option of searching online for a better definition of this image. You may also right click on an entry to Jump to the Entry or Image. Depending on where the image is located, Autoruns will open either Explorer or Regedit.
TEN
Save And Compare Logs: You may analyze your Autoruns and then save the data to your hard drive.
Autoruns will create an .arn file when you chose File>Save.
Being able to compare your current Autoruns data to a previous date, particularly if you are experiencing a slowdown in your computer or you have a problem, you may run Autoruns and compare it against any saved copies. This will give you a perfect side by side comparison of all the running images when your computer was working and when it is not.
ELEVEN
Kill Switch: You may Kill almost any task running on your computer. (Some tasks essential to your OS may not be deleted)
Autoruns lets you not only disable but delete almost any process. To disable an image, simply uncheck the box in front of the image. To delete an image use the right click menu and choose delete. However, the effect of the action in many cases, will not take effect until you reboot your system
TWELVE
Works With Process Explorer: Autoruns works seamlessly with Process Explorer as long as the image you wish to explore is actually running and the Process Explorer Program is running.
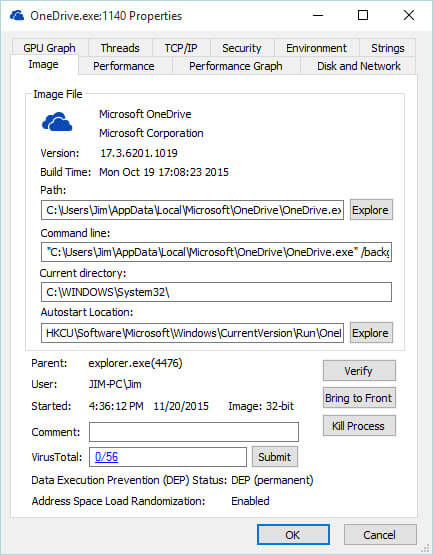
Process Explorer is another Windows Sysinternal tool. When it is running on your system, you may right click on any image while you are in Autoruns. This will bring up a menu allowing you to view the image in Process Explorer. This will display a very detailed view of the image. Note: You must be running version 16.05 of Process Explorer or later. The tabs offered are;
- Image – Displays information extracted from the image file. The path and the command line that launched the image. It also shows the time the image started. This is often useful in locating Malware. It will indicate if the image has been digitally signed. Because malware and viruses,
- Performance – Displays both memory and CPU performance data
- Performance Graph – Displays a history of the performance data
- Disk and Network – Displays any Disk and Network traffic used and caused by the image
- GPU Graph – Displays a history of the GPU usage
- Threads – Lists each of the threads running in the process. From this location you may Kill or Suspend a thread
- TCP/IP – Displays all TCP and UDP endpoints owned by the process.
- Security – displays the Security and privileges for all users.
- Environment – Displays the variables associated with this process
- Strings – Displays image strings from the process image file on the disk.
- Additional Tabs – Job; Net Assemblies, .NET Performance and Services will appear only for 32 Bit Functions
THIRTEEN
Remove Malware From Your System: Use Autoruns to find and remove malware from your system.
Because Autoruns lists every startup items from all locations, it will list any unauthorized startup items as well. I always check the Boot Execute tab because this is where some malicious code might reside. The Boot Execute tab shows every image that will start prior to the Operating System. For example, Chkdsk or the newer AutoCheck are programs that will check the integrity of your hard drives. These must have access to your computer prior to the operating system so the check will work correctly. There are other Boot loaders and programs that might use this area as well. Because it starts prior to Windows, it is a perfect target for malicious code.
Tutorial
Below is a quick tutorial on how malicious code might be discovered, disabled and or deleted on your system. The method shown is one I use and is based on the strategy developed by Mark Russinovich, the creator of Sysinternals Tools.
The first thing you should do if you really suspect that you have Malware on your system even if a scanner program did not detect is:
- Disconnect From The Internet – This will prevent the malicious code from replicating or adding more bad code to the system
- Boot into Safe Mode
- Identify malicious processes and drivers – Locate any suspicious DLLs, processes or drivers. Look for images that are unsigned, are packed, have any open TCP/IP endpoints. Particularly if the endpoints are out of country or have no description in the properties view from the process explorer. Be particularly suspicious of any Microsoft images that are unsigned.
- Delete the malicious code.
- Use Autoruns to disable and or delete any and all instances of the image.
After you have booted into safe mode – remember that a lot of malware will monitor the keys in the registry that they often use to get started. If they are deleted the malware will just reinstall them but if you are in safe mode they will not be able to in most cases.
- In Autoruns, use the filter options to make sure that you hide Windows and Microsoft entries (while it is possible there maybe malware hidden in a Windows file it is not as likely). It is more likely that a file named to mimic a Microsoft file but residing in an unauthorized path may exist.
- Check Verify Code Signatures so Autoruns will bring up any image that is not signed or signed by Microsoft.
- Finally click on Include Empty Images to ensure that all locations are inspected.
- Select Rescan or hit the refresh key F5
- Malware may hide in almost any place but the most likely places are the Boot Executable, Print Monitors and the LSA Providers sections. In any case, check on each tab to be sure.
- The malware filename will be found in the Image Path column. Look for Microsoft named files that are not created by Microsoft. The best way to do that is to see the image path.
Use the Search online function to review the file to get a better understanding. If there is more than one image with the same name, every time you delete one it will resurrect the other. To beat malware at it’s own game, just suspend both in Process Explorer and then delete them. You may also want to suspend a file to see if the effect on your computer has improved.
If you have any issues using the tips above, or just have questions about the program or my post, please do not hesitate to leave me a note in the forum.
Jim


Excellent article as always.
I have been using Auto-Runs for years, but only to remove “File Not Found”(Yellow) start-up left-overs. It helps a bit on my PC reaching my desktop, could be a placebo effect.
Thanks Megaman, remember in windows 10 the Known DLLs will always appear in Yellow. Windows will probably not let you change them anyway.
Jim
Thanks Jim, this was incredibly helpful!