My advice to any new computer owner/user is, invariably, to establish some sort of backup strategy right from the outset. It’s a fact of life that many underestimate the importance of regular backups, they get lulled into a false sense of security as the computer continues to boot up and operate as expected… Then, suddenly, the dreaded ‘blue screen of death’ and panic sets in as thoughts turn to the possibility of losing all that precious data; birthday photos of dear old Aunt Bertha, videos of the first born, Johnnie’s resume… What to do!
The shame of it being that the scenario can easily be avoided by instituting any of the commonly used backup methods, from simply saving any important data to external media right through to using the latest dedicated software. I used to back up all my photos, music, docs, etc. to CD/DVD discs and rely on my old Dell’s recovery option to get me out of any serious trouble… What a chore after reverting to factory settings; reconfiguring everything again, re-installing all my favorite software and then the updates, literally hours of downloading… There had to be a better way, and there was… Acronis True Image.
For the uninitiated; Acronis True Image’s main task, among many options, it to create an image of your entire system. This from the Acronis site: ‘back up your entire PC, including the OS plus your data, applications, pictures, video, financial documents, settings and everything!’
The image can then be saved to CD/DVD, flash drive or any internal/external hard drive as well as on a network share or FTP-server; from there you can search for and restore any individual files or restore the entire system. To aid in conserving space there are three levels of compression available; normal, high, and maximum, as well as the ability to schedule incremental and differential backups.
Acronis True Image has long been regarded as the premier imaging software and the latest version (2009) continues that trend with a host of new features making for even greater flexibility, for a full list of features take a look here: True Image Features
True Image has so many advantages over its rivals, freeware offerings in particular always seem to be missing at least one crucial component or are seriously limited in some way but the four key elements when making comparisons are; speed, versatility, ease of use and above all reliability. True Image meets all the requirements and then some; it is fast, extremely versatile, very easy to use and totally dependable.
I am a freeware nut and will search high and wide for free alternatives, as I did with imaging software. I say without hesitation, Acronis True Image represents the best investment and value for money I have ever outlaid for my computer.
To help demonstrate how easy it is to use True Image let’s go through the complete system backup process:
When Acronis first initializes, all the options will be configured for the most common settings by default so it is ready to go right out of the box. However, these can easily be viewed and changed by clicking on the ‘Tools’ tab and selecting ‘Options’, e.g. degree of compression, priority level, etc.
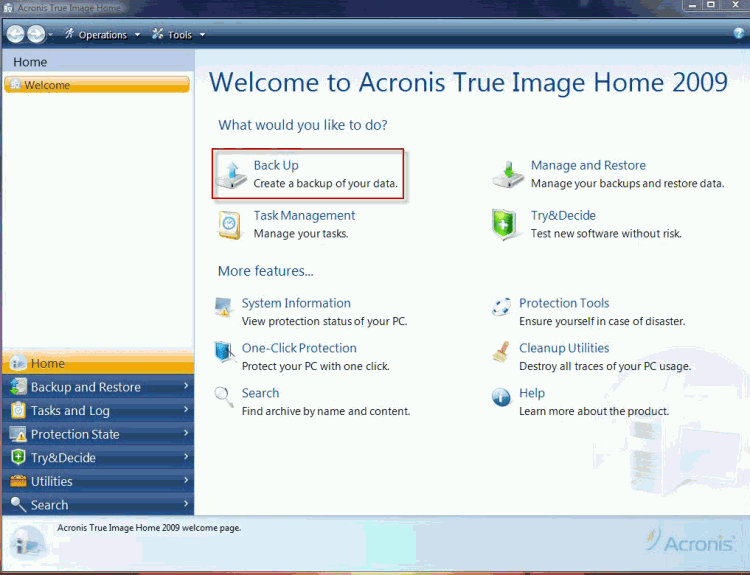
1) Start Acronis and you will see the ‘welcome’ screen. This is the main area from where you can select the various tasks. Obviously, in this case we would select the ‘Back up’ option.
THE WELCOME WINDOW

2) Now we can select exactly what it is we wish to backup. To backup the entire system select the ‘My Computer’ option:
THE DATA SELECTION WINDOW

3) Next we select the ‘source’ or, in other words, the location of the data we wish to backup. In most cases this will be the main drive (‘C’ drive). Acronis recognizes this fact and will display the window with ‘C’ drive selected by default. If you wish to change the ‘source’ just uncheck ‘C’ drive and place a checkmark next to the appropriate location.
THE ‘SOURCE’ SELECTION WINDOW

Note how Acronis recognizes all connected hard drives…. the last entry (Disk 3) is my external USB hard drive which will be the destination for the image.
4) Now its time to select the ‘destination’ or location for the saved image. In this case it is to drive ‘H’, my external hard drive.
THE ‘TARGET’ SELECTION WINDOW

For initial full backup select the ‘Create new backup archive’ option. Use the browse button to change/select the desired location. Click on the ‘Summary’ button if you are finished (see #6) or on the ‘Next’ button if you wish to set ‘scheduling’ or change any options (see #5).
5) This is after clicking on ‘Next’ in step #4. Click on ‘Summary’ to finish or on ‘Options’ to set scheduling or change backup options.
THE ‘PAT ON THE BACK’ WINDOW

THE ‘SCHEDULING’ WINDOW

6) Any time you hit the ‘summary’ button (in steps #4 and #5 or in the Scheduling window) the setup process will be complete and Acronis will display this window:
THE ‘SUMMARY’ WINDOW

You will notice I have selected, via the backup options, to ‘validate’ the archive. This will make the process somewhat longer but, in my opinion, is best enabled for both ‘creation’ and ‘restoration’ of full backups.
Now click on the ‘Proceed’ button and Acronis will begin the backup, displaying its ‘working’ window with a progress bar and estimated time to completion.
Acronis will issue you with a warning if you manage to choose incorrect settings or attempt something inadvisable.
THE ‘WARNING’ WINDOW

This after selecting the main drive (‘C’) as both source and destination.
This backup took Acronis just 21 minutes to create and save a 25gb image file using ‘Normal’ compression in ‘Normal’ priority mode (the default settings). There is so much more to Acronis, many more features and options to explore.
Conclusion: The best just got even better. Acronis True Image 2010 is replete with the most desirable features and useful options… A must have for anyone seeking a seriously reliable backup solution covering just about every eventuality.
I’ve been using Acronis True Image Home for years now. Before that I used Varitis; then Norton Ghost (neither would work with Windows 7). Acronis works best for me now. I’m using Acronis True Image Home 2011 (Currently the latest version). I do, however, install version 11 on systems that I build for my children and Grand Children because it is much simpler for them to use. Moving up from version 11 to 2009, 2010, and 2011 is a learning process, but the kids need it simple. My computer is set to automatically do a system backup once a week, and it has paid off a couple of times now. It saved hours of tedious work when needed to recover a failed syste,. It was well worth the expense.